
If you’re new to welding, choosing the right welding process can feel overwhelming. With so many options available—Stick, TIG, Flux Core, and MIG—many beginners struggle to know where to start. The good news is that MIG welding is often the easiest and most beginner-friendly welding process to learn.
As a mechanical engineering instructor and welding trainer with years of experience teaching students in technical education and vocational training programs, I’ve seen hundreds of beginners pick up a welding torch for the first time. One pattern is consistent: students who start with MIG welding usually gain confidence faster, produce better-looking welds sooner, and experience less frustration during the learning process.
MIG welding, also known as Gas Metal Arc Welding (GMAW), uses a continuously fed wire electrode and shielding gas to create strong, clean welds. Unlike stick welding, where you must frequently change electrodes, MIG welding allows you to focus more on your technique and less on managing consumables. This makes it an excellent choice for hobbyists, DIY enthusiasts, automotive repair beginners, farm owners, and aspiring welders looking to build foundational skills.
However, many beginners make costly mistakes when choosing their first machine. Some purchase welders that are too limited for future projects, while others spend hundreds of dollars on features they may never use. Understanding how MIG welding works, what equipment you need, and how to select a beginner-friendly machine can save both time and money.
In this guide MIG welding for beginners: complete step by step guide, I’ll walk you through everything you need to know about MIG welding for beginners, including how MIG welding works, the essential equipment you’ll need, common mistakes to avoid, safety considerations, and the best MIG welders for beginners based on real-world teaching and training experience.
By the end of this guide, you’ll have a clear understanding of whether MIG welding is right for you and how to choose a machine that matches your budget, skill level, and future welding goals.
Table of Contents
What Is MIG Welding?
MIG welding, short for Metal Inert Gas welding, is one of the most popular welding processes used in fabrication shops, automotive repair, farm maintenance, and home workshops. The technical name for MIG welding is Gas Metal Arc Welding (GMAW).
The process uses a continuously fed wire electrode that passes through a welding gun. When the wire contacts the workpiece, an electric arc forms, generating heat that melts both the wire and the base metal. As the molten metal cools, it creates a strong welded joint.
A shielding gas, typically a mixture of argon and carbon dioxide, protects the weld pool from contamination by oxygen, nitrogen, and moisture in the atmosphere. This protection helps produce cleaner welds with less slag and post-weld cleanup compared to many other welding processes.
One of the biggest advantages of MIG welding for beginners is that the wire feed system automatically supplies filler metal while you weld. This allows new welders to focus on maintaining proper gun angle, travel speed, and weld quality rather than constantly replacing electrodes.
In my experience as a welding instructor, students usually learn basic MIG welding techniques much faster than TIG welding and often produce acceptable welds after only a short period of practice.
How Does MIG Welding Work?
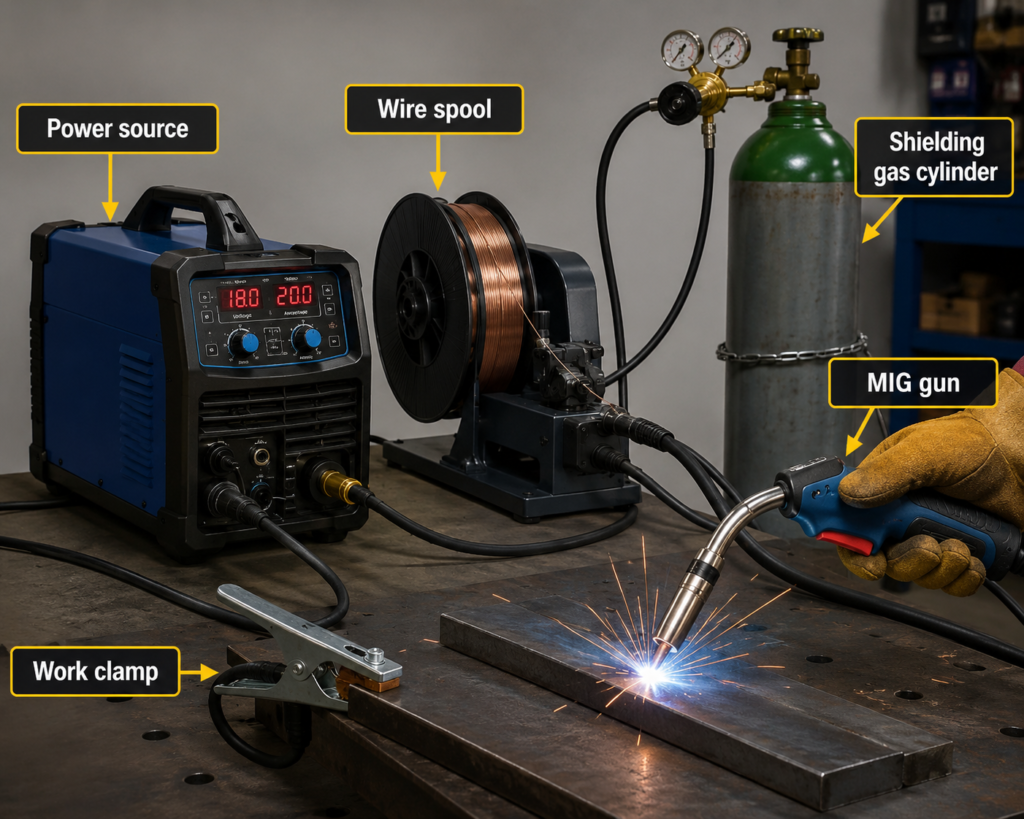
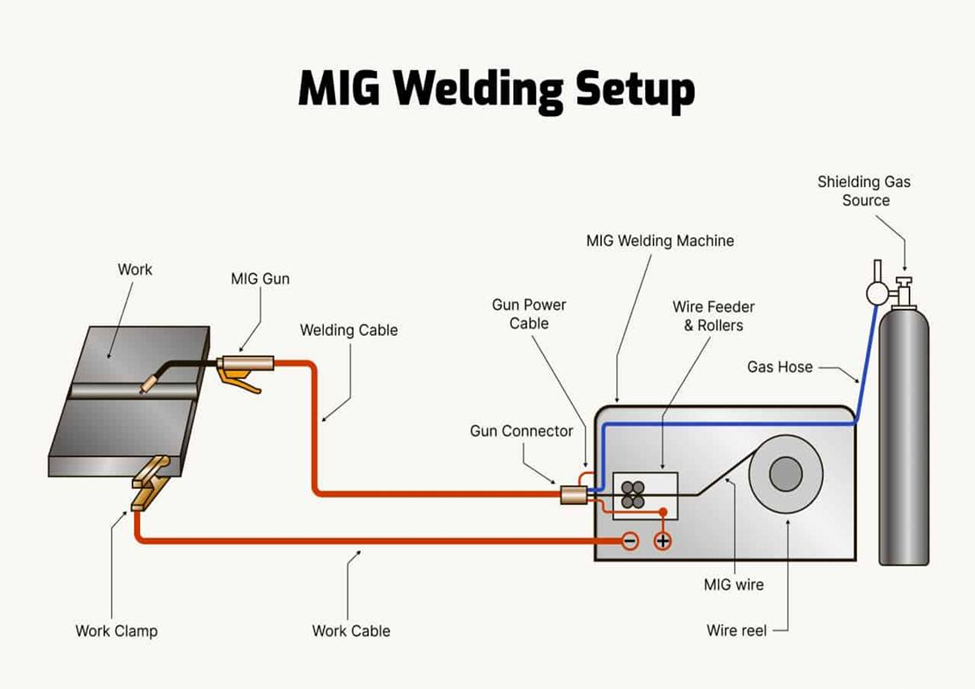
MIG welding works by using an electric arc to melt and join metal pieces together. When you pull the trigger on the MIG gun, a wire electrode is automatically fed through the gun while shielding gas flows around it. As the wire touches the workpiece, an electric arc forms, generating intense heat that melts both the wire and the base metal. The molten metal then cools and solidifies, creating a strong welded joint.
The shielding gas—typically a mixture of argon and carbon dioxide—protects the molten weld pool from contamination by oxygen and moisture in the air, helping produce clean, strong, and low-spatter welds.
In simple terms, MIG welding follows this process:
- The welder supplies electrical power.
- The wire feed system continuously feeds the electrode wire.
- The arc melts the wire and base metal.
- Shielding gas protects the weld pool.
- The molten metal cools and forms a solid weld.
Because the wire is fed automatically, beginners can focus on controlling the gun angle and travel speed instead of constantly replacing electrodes, making MIG welding one of the easiest welding processes to learn.
Why MIG Welding Is the Best Welding Process for Beginners
From my experience as a welding instructor, MIG welding is the easiest and most practical welding process for beginners because it offers several advantages:
- Easy to Learn: Simple operation and automatic wire feeding make it beginner-friendly.
- No Electrode Changes: Continuous wire feed eliminates the need to stop and replace electrodes.
- Forgiving Process: Produces good results even when your technique isn’t perfect.
- Faster Skill Development: Beginners typically learn MIG welding much faster than TIG or stick welding.
- Smooth, Controlled Welds: Helps new welders maintain a steady hand and create better-looking beads.
- Cleaner Welds: Produces less slag and requires minimal post-weld cleanup.
- Builds Confidence Quickly: Early success keeps beginners motivated and eager to improve.
- High Productivity: Faster welding speeds allow projects to be completed in less time.
- Versatile Applications: Suitable for automotive repairs, fabrication, farm equipment, and DIY projects.
- Practical Long-Term Skill: Widely used in manufacturing, maintenance, and professional welding industries. For anyone starting their welding journey, MIG welding provides the perfect combination of simplicity, speed, and real-world applications, making it one of the best first steps into welding.
MIG Welding vs Stick Welding vs TIG Welding
| Feature | MIG Welding (GMAW) | Stick Welding (SMAW) | TIG Welding (GTAW) |
| Ease of Learning | ⭐⭐⭐⭐⭐ Very Easy | ⭐⭐⭐ Moderate | ⭐ Difficult |
| Beginner Friendly | ⭐⭐⭐⭐⭐ Excellent | ⭐⭐⭐ Good | ⭐ Poor |
| Welding Speed | ⭐⭐⭐⭐⭐ Fast | ⭐⭐⭐ Moderate | ⭐⭐ Slow |
| Weld Appearance | ⭐⭐⭐⭐ Good | ⭐⭐⭐ Fair | ⭐⭐⭐⭐⭐ Excellent |
| Weld Quality | ⭐⭐⭐⭐ Very Good | ⭐⭐⭐ Good | ⭐⭐⭐⭐⭐ Outstanding |
| Metal Thickness | Thin to Medium | Medium to Thick | Thin to Medium |
| Outdoor Use | Poor (wind affects shielding gas) | Excellent | Poor |
| Cleanup Required | Very Little | High (slag removal) | Minimal |
| Equipment Cost | Moderate | Low | High |
| Consumable Cost | Moderate | Low | High |
| Productivity | High | Moderate | Low |
| Skill Requirement | Low | Moderate | High |
| Best For | Beginners, DIY, Automotive, Fabrication | Farm Repairs, Structural Work, Outdoor Jobs | Precision Work, Stainless Steel, Aluminum |
| Common Applications | Automotive repair, home projects, fabrication | Construction, pipelines, heavy equipment repair | Aerospace, food-grade welding, artistic work |
| Ideal User | First-time welders and hobbyists | Maintenance and repair welders | Experienced and professional welders |
Which Welding Process Should You Choose?
- Choose MIG Welding if you’re a beginner and want the easiest process to learn.
- Choose Stick Welding if you need to weld outdoors or work on thick, rusty steel.
- Choose TIG Welding if you need the highest-quality and most precise welds on thin materials or aluminum.
Instructor’s Recommendation: For most beginners, MIG welding is the best starting point because it offers the perfect balance of ease of use, speed, versatility, and professional-quality results.
Essential Equipment for MIG Welding Beginners
- MIG Welder:
The main power source that feeds welding wire and electricity to create a controlled arc for joining metals. It allows adjustable settings for voltage and wire speed to match different materials and thicknesses. - Welding Helmet:
A protective face shield with a darkened lens (auto-darkening or fixed shade) that protects the eyes and face from harmful UV rays, sparks, and intense arc light during welding. - Welding Gloves:
Heat-resistant gloves made from leather or insulated material that protect hands from heat, sparks, and sharp metal edges while maintaining flexibility for control. - Welding Pliers:
A multi-purpose tool used for cutting wire, cleaning spatter, removing tips, and handling hot metal parts safely during and after welding. - Wire Spool:
A coil of solid welding wire (electrode) that is continuously fed through the MIG gun to create the weld joint. Different wire types are used for different metals. - Shielding Gas:
A compressed gas (commonly CO₂ or Argon mix) that protects the weld pool from contamination by air, ensuring a clean, strong weld. - Clamps:
Holding tools used to firmly secure metal pieces in place, ensuring proper alignment and stability during welding for accurate and safe results.
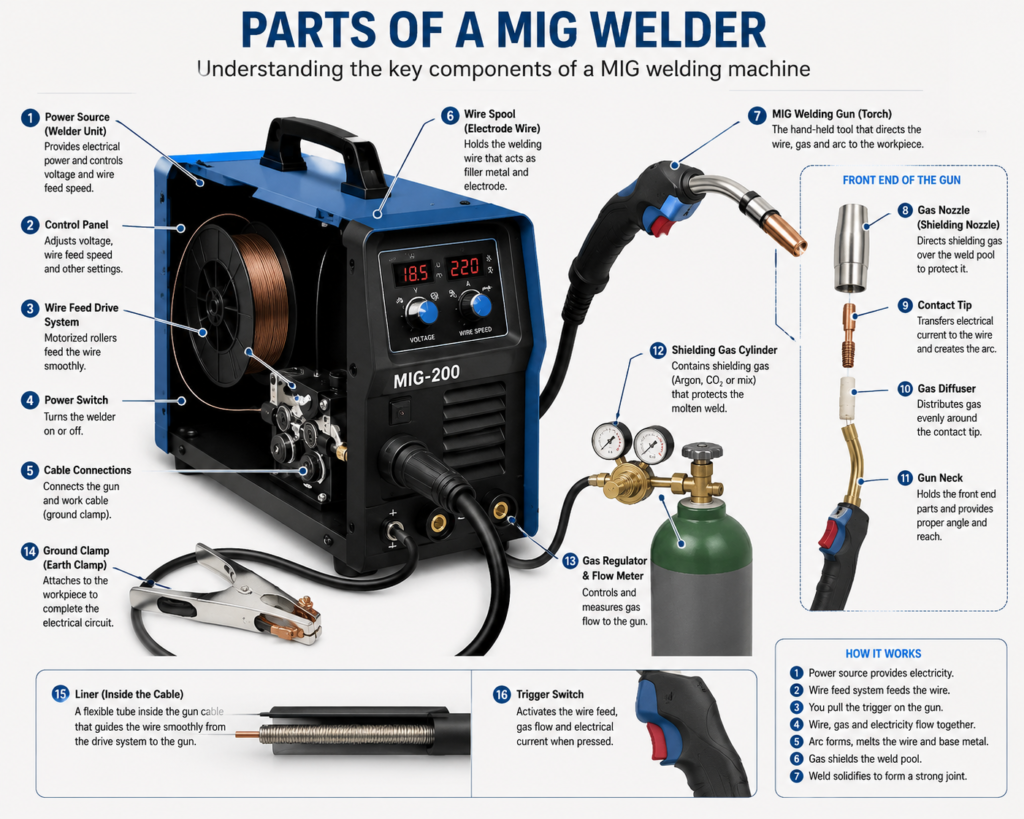
Parts of a MIG Welder
Choosing Your First Welder
Choosing your first MIG welder is one of the most important decisions in your welding journey. The right machine can make learning easier, faster, and more enjoyable, while the wrong choice can lead to frustration and wasted money. As a beginner, you should focus on simplicity, reliability, and a machine that matches your current projects as well as your future skill growth.
To avoid costly mistakes and confidently select the best beginner-friendly MIG welder, make sure to read our complete beginner guide where I break down real-world instructor experience, machine comparisons, and buying tips that actually matter in practice.
How to Set Up a MIG Welder
1. Start with Safety First
“Before we touch the machine, put on your PPE.”
- Wear welding helmet with correct shade
- Put on leather gloves
- Wear safety shoes and flame-resistant clothing
- Make sure the area is well ventilated
2. Connect the Power Supply
“Now check your machine connection.”
- Confirm voltage (110V or 220V as required)
- Plug the welder into the correct socket
- Keep the power switch OFF while connecting
3. Install the Wire Spool
“Open the side cover carefully.”
- Place the wire spool on the spindle
- Ensure correct direction of rotation
- Lock it tightly so it doesn’t slip during welding
4. Feed the Welding Wire
“Now we guide the wire through the system.”
- Straighten the wire end first
- Insert it into the drive rollers
- Feed it through the liner until it reaches the torch
5. Adjust Drive Rollers
“This step controls smooth feeding.”
- Set proper pressure on rollers
- Wire should move freely without slipping or crushing
6. Fit the Contact Tip and Nozzle
“Always match parts correctly.”
- Install correct size contact tip for wire diameter
- Fix the nozzle properly
- Check that everything is clean and tight
7. Connect Shielding Gas (if required)
“For gas MIG welding, this step is important.”
- Attach regulator to gas cylinder
- Connect gas hose to machine
- Open cylinder valve slowly
- Set gas flow (usually 10–20 L/min)
8. Attach the Ground Clamp
“Without a good ground, you will not get a stable arc.”
- Clamp it to clean bare metal
- Ensure tight and strong contact
9. Set Welding Parameters
“Now we prepare the machine for welding.”
- Adjust voltage based on material thickness
- Set wire feed speed
- Confirm polarity (usually DCEP for MIG)
10. Test the Wire Feed
“Always test before actual welding.”
- Pull the trigger on the gun
- Check wire feeding smoothly
- Verify gas flow (if using gas)
11. Practice on Scrap Metal
“Never start on the final job.”
- Do a trial weld on scrap piece
- Observe arc, sound, and bead shape
- Adjust settings if needed
Don’t let tangled wire and messy beads frustrate your first project. Master the craft from start to finish with our comprehensive guide. Get your copy of Mig Welding for Beginners on Gumroad and fast-track your welding skills
MIG Welding for Beginners Guide:How to MIG Weld step by
1. Surface Preparation
Before welding, clean the metal thoroughly. Remove rust, paint, oil, and dirt using a grinder or wire brush. A clean surface ensures better arc stability and stronger weld penetration. Dirty metal is one of the main causes of weak and porous welds.
2. Set Up the Machine
Start by placing your MIG welder on a stable surface and plugging it into the correct power supply. Check that all cables, torch, and ground clamp are properly connected. Make sure the machine is clean and free from dust or loose connections before turning it on
3. Connect the Shielding Gas
Attach the gas cylinder (usually Argon or CO₂ mix) to the regulator. Open the cylinder valve slowly and set the correct gas flow rate (typically 10–20 L/min depending on material). Check for leaks before starting welding.
4. Install the Wire Spool
Open the welder cover and place the wire spool on the spindle. Feed the wire through the drive rollers and into the liner until it reaches the MIG gun tip. Ensure the wire feeds smoothly without slipping or resistance.
5. Adjust Voltage Settings
Set the voltage according to the thickness of the metal. Lower voltage is used for thin sheets, while higher voltage is needed for thicker materials. Proper voltage ensures stable arc and good penetration.
6. Set Wire Speed
Adjust the wire feed speed so that the wire melts consistently into the weld pool. If the speed is too fast, the wire will push back; if too slow, the arc becomes unstable. Fine-tuning is key for a smooth weld.
7. Practice Bead Welding
Hold the MIG gun at a 10–15° angle and maintain a steady hand movement. Practice running a straight bead on scrap metal first. Focus on consistent travel speed, arc sound, and bead appearance.
8. Inspect the Weld
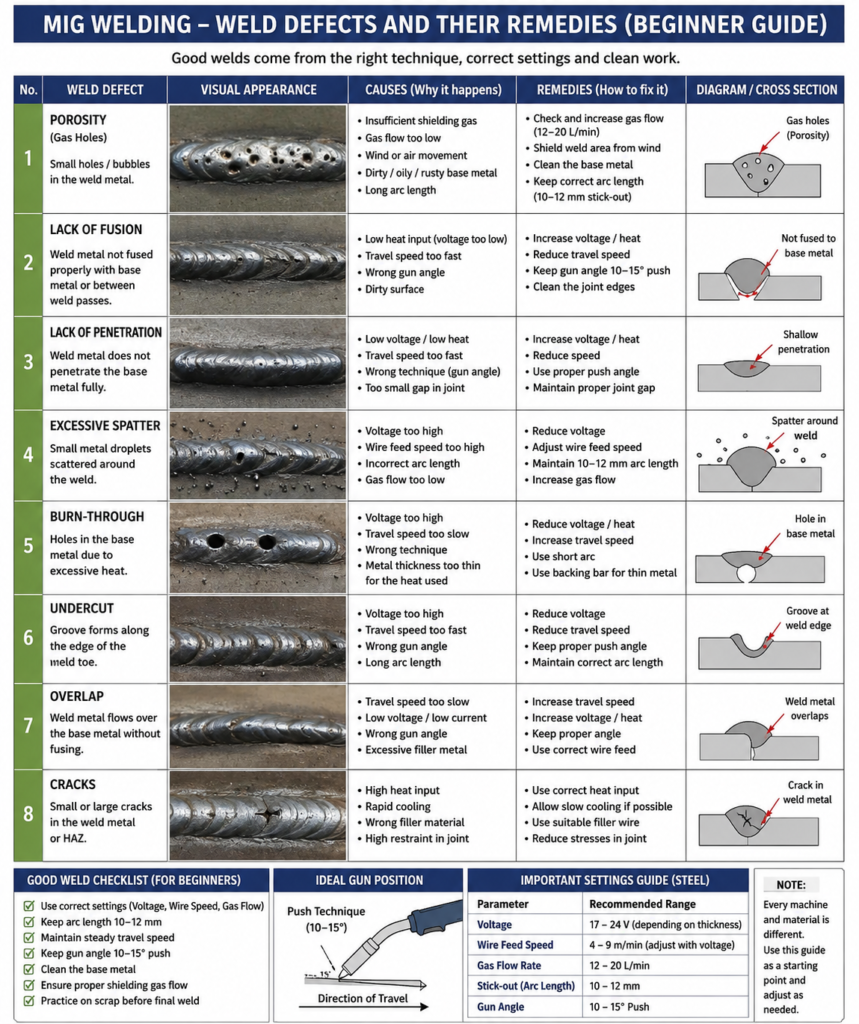
After welding, check the bead for uniform shape, proper penetration, and lack of defects like porosity or excessive spatter. A good weld should be smooth, even, and well-bonded to the base metal.
MIG welder Settings Chart
Standard Starting Settings (Universal Baseline)
These are safe “starting points” before fine tuning:
- Travel Angle: 10–15° push technique
- Polarity: DCEP (Reverse polarity) → most MIG welding
- Wire Type: ER70S-6 (mild steel general use)
- Shielding Gas (Steel): 75% Argon / 25% CO₂
- Gas Flow Rate: 12–20 L/min (25–40 CFH)
- Stick-out (wire length): 10–12 mm
MIG Welding Settings Chart Mild Steel (Most Common for Beginners)
| Thickness | Voltage | Wire Feed Speed | Wire Size | Gas Flow | Notes |
| 1 mm | 15–17 V | 3–4 m/min | 0.6 mm | 10–12 L/min | Thin sheet, avoid burn-through |
| 2 mm | 17–19 V | 4–5 m/min | 0.6–0.8 mm | 12–15 L/min | Best beginner practice range |
| 3–5 mm | 19–22 V | 5–7 m/min | 0.8 mm | 15–18 L/min | Strong structural joints |
| 6–10 mm | 22–26 V | 7–9 m/min | 0.8–1.0 mm | 18–20 L/min | Multi-pass recommended |
Stainless Steel (Requires Cleaner Settings)
| Thickness | Voltage | Wire Feed Speed | Wire Type | Gas |
| 1–2 mm | 16–18 V | 3–4 m/min | ER308L / ER316L | 98% Argon + 2% CO₂ |
| 3–5 mm | 18–21 V | 4–6 m/min | ER308L | Same mix |
⚠️ Tip: Keep heat lower than mild steel to avoid discoloration and warping.
MIG welding techniques for beginners
1. Proper Gun Position (Most Important Skill)
The way you hold the MIG gun controls almost everything.
✔ Push Technique (Recommended for beginners)
- Gun is tilted 10–15° forward
- You push the weld pool away from you
- Produces:
- Cleaner weld
- Better visibility
- Less spatter
✔ Pull Technique
- Gun is tilted backward
- Stronger penetration but rougher bead
- Used in thicker materials
👉 Beginner rule: Start with PUSH, not pull
2. Maintaining Correct Arc Length
Arc length = distance between wire tip and workpiece.
Ideal:
- About 10–12 mm stick-out
If too long:
- Weak arc
- Spatter increases
- Poor penetration
If too short:
- Wire sticks to workpiece
- Unstable arc
👉 Think of it as “controlled hovering” above the metal.
3. Travel Speed Control
This is where most beginners struggle.
Too fast:
- Thin, weak weld bead
- Poor fusion
Too slow:
- Excess heat
- Burn-through on thin metal
- Big ugly bead
Correct speed:
- Steady “walking pace”
- Watch puddle, not arc
👉 Rule: Puddle should stay 1.5–2x wire width
4. Gun Angle Control
Correct angle improves bead shape and penetration.
- Forward tilt: 10–15° (best for beginners)
- Side angle: keep 0–5° sideways deviation max
👉 Avoid swinging the gun randomly—keep it stable.
5. Puddle Control Technique
The weld pool (puddle) is your main guide.
What to observe:
- Puddle should be shiny and fluid
- Should “wet” edges of joint evenly
- No excessive bouncing or splashing
👉 Beginner tip: Always watch the puddle, not the arc light
6. Straight Bead Technique (First Skill to Master)
Before fancy patterns, master straight welding.
Steps:
- Strike arc
- Maintain steady travel speed
- Keep constant stick-out
- Move in straight line
👉 Goal: Uniform bead width and height
7. Weaving Technique (For Thicker Metals)
Used when joint is wider or needs more fill.
Common patterns:
- Zig-zag
- Small circles
- C-shaped motion
Beginner warning:
Don’t over-weave → causes weak fusion edges
8. Tack Welding Technique
Tacks hold your work before final welding.
Best practice:
- Place tack welds at both ends
- Then middle if long joint
- Ensure alignment before full weld
9. Surface Preparation Technique
Even perfect technique fails on dirty metal.
Before welding:
- Remove rust
- Remove paint
- Remove oil/grease
- Use grinder or wire brush
👉 Clean metal = strong weld
10. Gas Shielding Control
Shielding gas protects molten weld pool.
Beginner settings:
- 12–20 L/min flow rate (steel)
- Keep nozzle close to weld
Common mistake:
- Welding in wind → causes porosity
👉 Always weld in a calm or shielded area
⚠️ Beginner Mistakes to Avoid
- Long arc length
- Too fast travel speed
- Welding dirty metal
- Ignoring gas flow
- Overheating thin material
- Not maintaining steady hand
Simple Master Rule
👉 “Stable hand + steady speed + clean metal = strong weld”
New to welding? Start with our complete guide, How to Start Welding at Home (Complete Beginner Guide 2026) and learn everything you need to set up your first workshop, choose the right equipment, and begin welding safely with confidenc
MIG Welding Safety Tips for Beginners
1. Always Wear Proper PPE (Personal Protective Equipment)
Before you even strike an arc:
- 🪖 Welding helmet (auto-darkening preferred, Shade 10–13)
- 🧤 Heat-resistant leather gloves
- 🧥 Flame-resistant jacket or cotton clothing
- 👖 No synthetic clothes (they melt on skin)
- 👢 Safety boots (steel toe recommended)
👉 Rule: No PPE = No welding
2. Protect Yourself from Arc Flash
MIG welding produces intense UV and IR radiation.
- Always keep helmet down before arc starts
- Never look at arc without protection
- Cover exposed skin (neck, arms)
⚠️ Arc flash can burn skin like a sunburn in seconds
3. Work in a Well-Ventilated Area
Welding fumes are dangerous.
- Work in open or ventilated workshop
- Use exhaust fan or fume extractor if possible
- Avoid breathing directly over weld area
⚠️ Never weld in closed rooms without airflow
4. Keep Fire Safety Ready
MIG welding produces sparks and hot metal.
- Keep fire extinguisher nearby (CO₂ or Dry Powder type)
- Remove flammable materials (oil, paper, fuel)
- Keep a bucket of sand or water nearby (basic backup)
👉 Always check surrounding area before welding
5. Electrical Safety (Very Important)
- Check welding cables for damage
- Ensure proper grounding (earth clamp secure)
- Do not touch electrode wire with bare hands
- Keep machine dry at all times
⚠️ Wet hands + electricity = serious shock risk
6. Proper Ground Clamp Connection
- Attach clamp directly to clean metal
- Remove rust/paint at connection point
- Ensure tight contact
👉 Poor grounding = unstable arc + welding defects + safety risk
7. Keep Workspace Clean and Organized
- Remove clutter from welding area
- Keep cables organized (no tripping hazard)
- Keep gas cylinder secured upright with chain
8. Handle Shielding Gas Safely
- Always secure gas cylinder with chain
- Never drop or roll cylinders
- Open valve slowly
- Check for leaks before starting work
⚠️ Gas cylinder mishandling can be dangerous
9. Avoid Hot Metal Burns
After welding:
- Metal stays hot even after arc stops
- Use pliers or tongs for handling
- Mark hot parts if in shared workspace
10. Stay Focused and Avoid Distractions
- No phone use while welding
- Don’t weld when tired or rushed
- Focus on arc and puddle only
👉 Most accidents happen due to distraction, not machine failure
Golden Rule for Beginners
👉 “Safety first, welding second”
For detailed safety requirements, review the welding safety guidelines by American welding society
Quick Safety Checklist (Before Every Weld)
✔ PPE on
✔ Gas cylinder secured
✔ Ground clamp tight
✔ Area clear of flammables
✔ Ventilation working
✔ Cables inspected
What is MIG welding?
MIG (Metal Inert Gas) welding is an arc welding process that uses a continuously fed wire electrode and shielding gas to join metal pieces together. It is one of the easiest welding methods for beginners to learn.
Is MIG welding easy to learn?
Yes. MIG welding is generally considered the easiest welding process for beginners because the machine automatically feeds the wire, making it easier to create clean, consistent welds.
What is the best MIG welder for beginners?
A 140-amp MIG welder with adjustable voltage settings is an excellent choice for beginners because it can handle most home, hobby, and light fabrication projects.
What gas should beginners use for MIG welding?
For mild steel, beginners should use a 75% Argon and 25% CO₂ gas mixture (C25), which produces a stable arc and cleaner welds with less spatter.
Can I MIG weld without gas?
Yes. By using flux-cored wire, you can weld without an external gas cylinder. This method works well outdoors but usually creates more smoke and spatter.
How thick of metal can a beginner MIG welder weld?
Most beginner MIG welders can weld materials ranging from thin sheet metal up to 1/4 inch (6 mm) steel, depending on the machine’s amperage.