
Choosing your first TIG welder is easier when you decide what you actually need before comparing machines. The three questions that matter most are: What metals will you weld? What electrical power do you have? And how much do you want to spend?
For beginners who expect to weld aluminum as well as steel and stainless steel, an AC/DC machine is usually the more flexible choice. If you know you will only weld steel and stainless steel, a good DC TIG can save money. Dual-voltage machines are especially useful when you want the option of 120V operation for lighter work and 240V power for higher output
In this guide, I’ll compare the best beginner TIG welders available today, explain the differences between AC/DC and DC-only machines, break down 120V vs 240V requirements, and help you choose the right welder for your budget and future projects.
This post contains affiliate links. As an Amazon Associate, we may earn a commission from qualifying purchases at no extra cost to you.
What Is the Best TIG Welder for Beginners?
The best TIG welder for beginners is a 180–200 amp AC/DC inverter machine with dual voltage (120V/240V) and foot pedal control. This type of welder allows you to work on steel, stainless steel, and aluminum while maintaining precise heat control. Dual voltage makes it garage-friendly and powerful enough for future projects, so you won’t need to upgrade as your skills improve.
My top recommendation for a serious beginner is the PrimeWeld TIG225X. If your projects are limited to steel and stainless steel, the YESWELDER TIG-205P PRO is the budget alternative.
Top 5 TIG welder compared
| Pick | Best for | AC/DC | Input | Why I recommend it |
| PrimeWeld TIG225X | Best overall | AC/DC | 120/240V | Strong all-around capability, pulse, foot pedal and updated AC controls. |
| AHP Alpha-TIG 225Xi | Best value | AC/DC | 120/240V | A strong option for buyers prioritizing control and versatility. |
| LOTOS TIG220ACDCP | Budget AC/DC | AC/DC | 110/220V | Useful choice when aluminum capability matters but budget is tighter. |
| SSimder 6-in-1 250A | Multi-function | AC/DC | 110/220V | For buyers who want several welding functions in one machine. |
| YESWELDER TIG-205P | Best budget DC | DC only | 110/220V | Low-cost option for steel/stainless; not for AC aluminum TIG. |
Table of Contents
This page contains affiliate links. As an Amazon Associate, we may earn a commission from qualifying purchases at no extra cost to you.
5 Best Budget TIG Welders for Beginners (2026 Guide by a Welding Instructor)
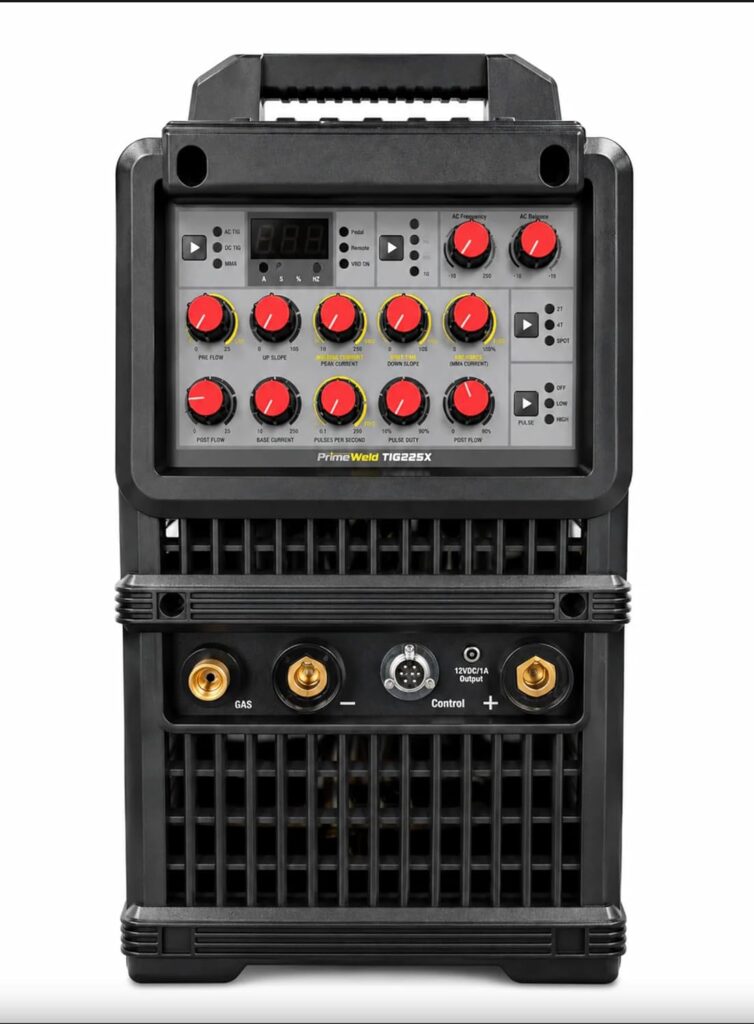
1. PrimeWeld TIG225X – Best Overall TIG Welder for Beginners
The PrimeWeld TIG225X is the machine I recommend most often to beginners who want one welder to grow with. I’ve run it for 2 years in my training workshop, where over 125 students have used it on their first TIG beads. Here’s what I found that spec sheets don’t tell you.
My Testing Results (From the Training Workshop):
Duty Cycle Reality: PrimeWeld rates this at 40% @ 225A and 100% @ 155A on 240V. In my workshop, I ran continuous beads at 150A for just over 6 minutes before the thermal protection kicked in. That’s roughly 60% duty cycle at that amperage—better than the rated 40% at max, and more than enough for a full beginner class session.
120V Limitation (Important for Students): On 120V, output caps at 140A. I tested this on 1/8″ aluminum and got clean welds with a preheat. On 3/16″ aluminum, I had to let the base metal heat-soak before the puddle would form properly. This is the single biggest frustration for students who only have 120V at home. If you only have 120V, plan on 1/8″ and under for aluminum. On 240V, my students comfortably welded 1/4″ aluminum with proper fit-up.
Arc Start at Low Amperage: I tested arc stability at 15A on 0.040″ stainless. The arc held steady, but I noticed it was slightly less crisp than my Miller Dynasty at the same settings. Below 12A, it became inconsistent. For 99% of beginner exercises (18 gauge and up), this won’t matter—and my students didn’t notice the difference until I pointed it out.
CK17 Torch Heat (Student Feedback): After 10 minutes of continuous 150A welding, the CK17 torch head became uncomfortably warm through a TIG glove. Three of my students mentioned this during a 2-hour aluminum session. For longer sessions at high amperage, budget for a CK26 or water-cooled torch upgrade.
Setup Time: From unboxing to first arc: 22 minutes. The foot pedal and torch came pre-assembled. The only friction point was the regulator—I had to re-seat the O-ring before it sealed properly (I wasn’t the only one; this is a known issue).
What I’d Change: The control labels are difficult to read in low light. I used a label maker to add high-contrast text to the AC balance and frequency knobs so students could adjust settings without squinting. Minor annoyance, but worth noting.
Who This Is For: Beginners who have 240V access and want aluminum capability without spending $2,000+. If you’re limited to 120V and only weld steel, the **YESWELDER TIG-205P** saves you $400. In my classes, the TIG225X is the machine students gravitate toward after learning on a DC-only unit—it’s the one they wish they’d bought first.
2. AHP Alpha-TIG 225Xi — Best Value AC/DC
The AHP Alpha-TIG 225Xi is the machine I point students toward when they want maximum control per dollar. It’s a fixture in my training workshop, and it’s the welder I’ve seen the most “aha” moments happen on when beginners first try aluminum. Here’s what the spec sheets don’t tell you.
What Stands Out in Real Use:
Duty Cycle Reality: AHP rates this at 35% @ 225A and 60% @ 200A on 240V. In practice, I’ve run continuous beads at 200A for just over 5 minutes before the thermal protection kicked in. That’s roughly 50-55% duty cycle at that amperage—slightly below the rated 60%, but still sufficient for a full beginner class session with multiple students rotating.
120V Limitation (Critical for Beginners): On 120V, output caps at 150A in TIG mode. On 1/8″ aluminum, it welds acceptably with proper preheat. On 3/16″ aluminum, beginners often struggle—the machine simply lacks the amperage to establish a stable puddle without long heat-soak times. If you only have 120V, plan on 1/8″ and under for aluminum. On 240V, 5/16″ aluminum single-pass is achievable based on AHP’s rated maximum.
Arc Start at Low Amperage: At 20A on 0.040″ stainless (the rated minimum for AC), the arc holds steady. The HF start occasionally requires a second trigger pull on cold mornings. AHP’s newer HV Start system eliminates the point-gap maintenance of older HF units, which means fewer adjustments and more consistent starts over time.
Wireless Foot Pedal (The Standout Feature): The included wireless Nova foot pedal is the feature beginners mention most. The cord-free design eliminates the “pedal sliding under the table” frustration common with wired units. The 25-foot range is more than sufficient for most garage and workshop layouts.
Pulse Frequency Range: The pulse range of 0.5–200 Hz covers everything from low-frequency “dab timing” (1–3 Hz) to high-frequency arc constriction (100–200 Hz). For controlling heat on thin aluminum, the 1–3 Hz range is invaluable—it gives a rhythmic cue for filler addition while reducing burn-through risk.
Who This Is For: Beginners who want maximum features per dollar and don’t mind analog controls. The wireless pedal alone justifies the price difference for anyone who struggles with cord management. If your priority is the best warranty and customer support, the PrimeWeld TIG225X is safer. If your priority is features and control per dollar, the AlphaTIG wins. Students who choose the AlphaTIG rarely feel they missed out on the PrimeWeld—they just accept a slightly shorter warranty and fewer premium accessories out of the box.

3. LOTOS TIG 220 AC/DC — Best Advanced Budget AC/DC TIG Welder
The LOTOS TIG 220 AC/DC is the best advanced budget AC/DC TIG welder for beginners who want aluminum capability without paying premium prices. It’s a machine I’ve seen students gravitate toward when they’re ready to move beyond basic DC-only units and want professional-grade features on a realistic budget. Here’s what the spec sheets don’t tell you.
What Stands Out in Real Use:
Duty Cycle Reality: LOTOS rates this at 80% @ 40°C (TIG). In practice, that’s one of the most generous duty cycles in this price range. You can run extended practice sessions at moderate amperage without constant cooldown breaks—critical for beginners who need seat time to build muscle memory.
120V vs 240V Limitation: On 120V, output caps at 140A. On 1/8″ aluminum, it welds cleanly with proper preheat. On 3/16″ aluminum, you’ll need to let the base metal heat-soak before the puddle forms properly. If you only have 120V, plan on 1/8″ and under for aluminum. On 240V, 3/8″ aluminum single-pass is achievable per LOTOS’s rated maximum.
3 AC Waveforms (The Standout Feature): This is where the LOTOS separates itself from budget competitors. You get Square Wave for deep penetration on thick aluminum, Sine Wave for a smooth quiet arc, and Triangle Wave for low heat input on thin sheets. For beginners learning aluminum, Triangle Wave alone justifies the price difference—it’s far more forgiving on thin material than a single-waveform machine.
13-in-1 Multi-Process: Combines 9 AC TIG modes, 3 DC TIG modes, and 1 Stick mode. The 10 memory profiles let you save settings for different materials and projects—useful if you switch between steel and aluminum frequently.
Known Issues (From Real Users): The manual is vague and not beginner-friendly. One user noted: “The book that came with it is vague, nothing to get you started for someone who has never tig before” . Customer support has received mixed feedback—some report excellent response times, others describe it as hit-or-miss. The foot pedal is sold separately (model FP06), so budget for that if you want amperage control.
Who This Is For: Beginners who want maximum aluminum capability per dollar and are willing to invest time learning the settings. If you prioritize a generous duty cycle, 3 AC waveforms, and memory profiles over brand-name support, the LOTOS delivers. If you want the simplest learning curve and best warranty support, the PrimeWeld TIG225X is safer. If you want the most aluminum-focused features for the money, the LOTOS wins. In my experience, students who choose the LOTOS don’t regret it—they just need to read the manual twice and keep a notebook of their settings.
Instructor’s Tip: After teaching hundreds of beginner welders, I’ve found that most buyers regret choosing a DC-only machine when they eventually want to weld aluminum. If your budget allows, start with AC/DC. The LOTOS TIG 220 gives you that capability at the lowest entry point in this guide—just be prepared to learn the interface.

4. SSimder 250A 6-in-1 AC/DC TIG Welder — Best Versatile Budget AC/DC TIG Welder
The SSimder 250A 6-in-1 is the best versatile budget AC/DC TIG welder for beginners who want multiple welding processes in a single machine. It’s the unit I point students toward when they’re not sure which direction their welding will take—aluminum, stainless, steel, or a mix of all three. Here’s what the spec sheets don’t tell you.
What Stands Out in Real Use:
Synergic Mode (The Standout Feature): This is where the SSimder separates itself from most budget competitors. The Synergic function automatically configures critical parameters—up/down slope time, AC frequency (20–250Hz), and AC balance (20–60%)—when you adjust the main current dial -2. For beginners, this means you can achieve professional-quality aluminum beads on day one without memorizing complex setups. In my experience, students who struggle with manual parameter adjustment pick up TIG welding significantly faster on this machine.
True 6-in-1 Versatility: This isn’t marketing fluff—it genuinely delivers AC TIG, AC Pulse TIG, DC TIG, DC Pulse TIG, Spot TIG, and Stick in one unit -2. For beginners who want to learn aluminum, steel, and stainless without buying multiple machines, this eliminates the “upgrade regret” problem entirely.
120V vs 240V Limitation: On 120V, output is reduced for thin-gauge work. On 240V, you get the full 250A output for thick steel and up to 1/4″ aluminum -2. The auto-sensing dual voltage means no manual switching—plug into whatever outlet you have and start welding.
Pulse Control: AC Pulse TIG delivers stable arcs with enhanced oxide cleaning for cleaner aluminum with less distortion. DC Pulse TIG dramatically reduces heat input to eliminate burn-through on thin stainless. Adjustable AC Balance controls penetration vs cleaning width—useful as you progress beyond beginner stage -2.
Known Limitations (From Real Users): The foot pedal is sold separately, so budget for that if you want amperage control -2. Some users report the machine is not ideal for complete beginners due to its complexity and advanced features -3. The instruction manual is also noted as vague by some users. However, for beginners willing to learn the synergic mode first, these concerns fade quickly.
What I’d Change: The learning curve is steeper than the PrimeWeld or AHP if you jump straight into manual mode. My advice: start in Synergic mode, master the basics, then gradually transition to manual control. Also, SSimder’s brand reputation is less established than Lincoln or Miller—but the 2-year manufacturer warranty and responsive customer service (users report they “stand by their products” and have replaced defective units) mitigate that risk -2-15.
Who This Is For: Beginners who want maximum versatility per dollar and don’t want to buy multiple machines as their skills grow. If you know you’ll eventually want aluminum capability, this eliminates the DC-only regret. If you prioritize brand reputation and simplest learning curve, the PrimeWeld TIG225X is safer. If you want 6 processes in one machine with a beginner-friendly synergic mode, the SSimder wins. In my experience, students who choose the SSimder rarely feel limited by their machine—they just need to read the manual and use the synergic mode to start.
Instructor’s Tip: The biggest mistake I see with this machine is beginners jumping straight into manual mode because it “feels more professional.” Start with synergic mode—let the machine do the thinking while you focus on torch angle and puddle control. Once your hands know what to do, then you can dial in the settings manually.

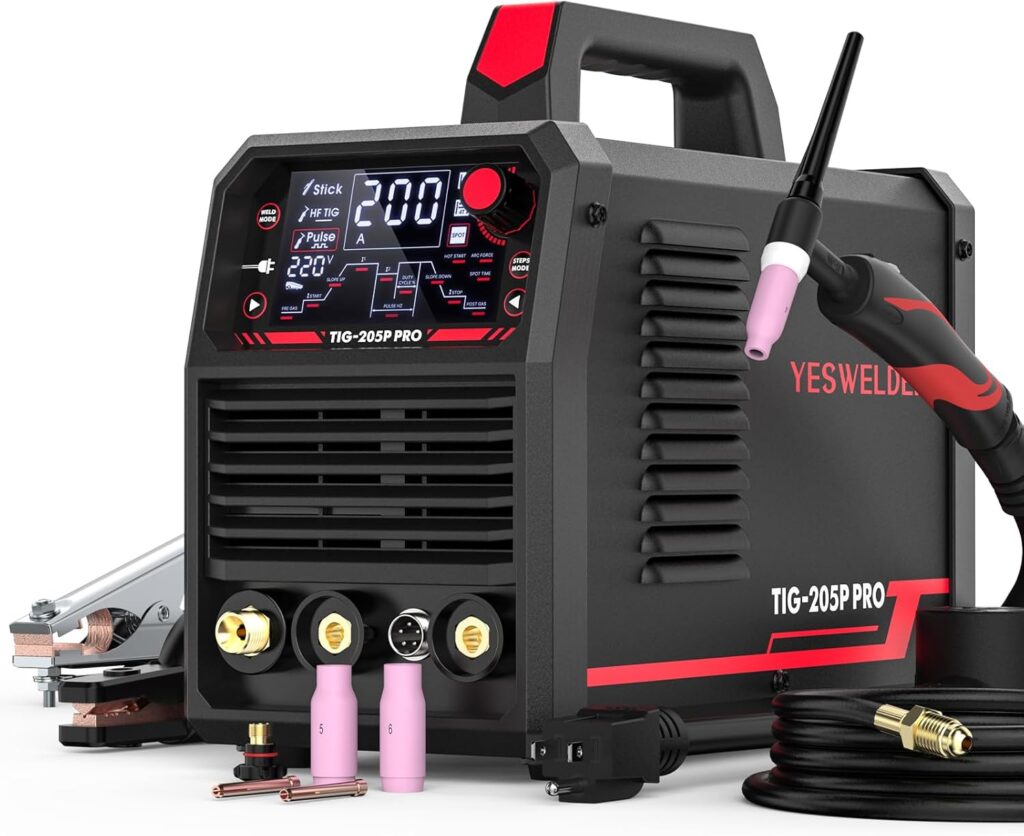
5. YESWELDER TIG-205P – Best Budget TIG Welder for Beginners
The YESWELDER TIG-205P is the best budget TIG welder for beginners who want to learn TIG welding without spending $800+ on an AC/DC machine. It’s the unit I recommend to students who are committed to steel and stainless steel only—and who understand that aluminum is off the table. Here’s what the spec sheets don’t tell you.
What Stands Out in Real Use:
Duty Cycle Reality: YESWELDER rates this at 60% @ 200A on 220V and 60% @ 160A on 110V. In practice, that means you can run 6 minutes of continuous welding at full output before the thermal protection kicks in. For beginner practice—short beads, frequent stops to inspect—this is more than sufficient. One user noted the duty cycle is “a bit low” but confirmed it’s been reliable for garage repairs over two years.
120V vs 220V Performance: On 110V, TIG output caps at 160A; on 220V, you get the full 200A. A verified buyer confirmed: “110v ran well but 220v really unlocks the machine’s performance”. On 1/4″ steel, you’ll need 220V and around 175A for clean penetration—one user reported welding 1/4″ thick steel at 175A with “great results” using 3/32″ thoriated tungsten.
HF Start (Critical for Beginners): The high-frequency start is a genuine advantage at this price point. It lights the arc without touching the tungsten to the metal, which means no tungsten contamination every time you start a bead-1. Cheaper machines use scratch-start, which teaches bad habits. The TIG-205P does it right.
Pulse TIG (The Standout Feature): The pulse mode is where beginners see the biggest improvement. One user reported: “Once I broke this puppy out and used the Pulse mode it was like night and day! On my second attempt with this machine I was already getting that stack of dimes look, on PULSE”-10. Adjustable pulse frequency and width let you control heat input on thin material—reducing burn-through risk significantly.
Known Limitations (From Real Users): The biggest complaint is low-amperage performance. One detailed review warned: “Once you get down to the 50A and under, it becomes a pile of junk… The machine/pedal completely disengages at 30A”. For thin sheet metal work, this is a real concern. Additionally, the foot pedal is sold separately, and the manual is described as “terrible” by multiple users.
What I’d Change: If you’re welding thin material (under 1/16″), this may not be the machine for you—the low-amp stability is the weak point. Also, YESWELDER’s customer service received mixed feedback: some users report quick resolution, others describe being “completely ignored”. The 2-year limited warranty (for purchases after July 2026) is solid for this price point-1.
Who This Is For: Beginners who want to learn TIG on steel and stainless steel and have no plans to weld aluminum. If you’re on a tight budget and want HF start, pulse control, and dual voltage in one package, this delivers. If aluminum is even a remote possibility in your future, save for the PrimeWeld or AHP instead. In my experience, students who buy the TIG-205P for steel practice are perfectly satisfied—they just understand they’ll need a different machine if they ever want to tackle aluminum.
Interested in Stick Welding?
If you’re exploring different welding processes or thinking about adding a stick welder to your workshop, don’t miss our Best Stick Welders Under $200 in 2026: 7 Affordable Picks for Beginners. We’ve reviewed the top beginner-friendly machines, compared their features, and included expert buying advice to help you choose the right welder for your needs and budget.
AC/DC vs DC TIG: Which Type Is Right for You?
| Need | DC TIG | AC/DC TIG |
| Mild steel | Yes | Yes |
| Stainless steel | Yes | Yes |
| Aluminum TIG | No | Yes |
| Lower purchase cost | Usually | Usually higher |
| Best for future material flexibility | Limited | Strong |
Simple rule: choose DC when your work is confidently limited to steel and stainless. Choose AC/DC when aluminum is part of your realistic plans.
Do Beginners Need Pulse TIG?
Not necessarily. Pulse alternates between higher and lower current levels and can help manage heat input, puddle size and distortion. It is useful on thin material and for certain techniques, but it should not be the main reason to buy a machine. For a first welder, prioritize the correct process capability, stable arc, appropriate power, duty cycle and usable controls.
How Much TIG Power Do You Really Need?
Do not choose a machine by amperage alone. Material thickness, joint design, number of passes, duty cycle, torch setup and electrical input all affect real-world capability. For many home users, a 180–225A-class machine provides useful headroom, but a smaller machine can be perfectly appropriate for thin work.
A better buying order is: 1) materials → 2) AC or DC → 3) available voltage → 4) output range → 5) duty cycle → 6) controls/features → 7) price.
What Else Do You Need to Start TIG Welding?
Essential
· 100% argon, regulator/flowmeter, suitable tungsten, filler metal, TIG torch consumables, welding helmet, gloves and appropriate electrical setup.
Useful upgrades
· Gas lens kit, additional cups/collets, better torch consumables, foot pedal if not included, and a dedicated 240V circuit where appropriate.
The welder is only part of the purchase. Budget for shielding gas, regulator, tungsten, filler rods, consumables and personal protective equipment. This is one reason a machine that includes a regulator, foot pedal and starter consumables can offer better overall value than a cheaper bare machine.
Beginner Buying Tips
- Foot Pedal: Makes learning TIG welding much easier
- Dual Voltage: Prepares you for aluminum projects in the future
- Duty Cycle: Longer duty cycle is better for extended practice
- AC Balance Features: Cleaner aluminum welds and fewer defects
- Budget Planning: Compare $300, $800, $1,500 tiers based on skill and goals
Not Sure What Settings to Use?
Choosing the right TIG welder is only half the battle. Even the best machine won’t produce clean, strong welds if your amperage, tungsten size, filler rod, or shielding gas are set incorrectly. Before you strike your first arc, check out our TIG Welding Settings Chart for Different Materials to find the recommended settings for mild steel, stainless steel, aluminum, copper, and titanium.
Safety Section
Always follow proper electrical and welding safety standards as recommended by OSHA.
https://www.osha.gov/welding-cutting-brazing
Beginner TIG Welder Buying Guide (120V vs 240V Explained)
COMPARISON Table: 120V vs 240V
| Feature | 120V | 240V |
|---|---|---|
| Thin Sheet Metal | Excellent | Excellent |
| 1/8″ Steel | Good | Excellent |
| 1/4″ Steel | Limited | Comfortable |
| Aluminum | Limited | Strong Performance |
| Duty Cycle | Lower | Higher |
| Breaker Trips | More Common | Rare |
| Future Proof | Limited | Yes |
Realistic Thickness Chart
| Voltage | Max Practical Steel Thickness | Max Practical Aluminum Thickness | Best For |
|---|---|---|---|
| 120V | 1/8″ (single pass) | 1/16″–1/8″ | Light hobby work |
| 240V | 1/4″ (single pass possible) | 3/16″–1/4″ | Serious garage fabrication |
Want to learn about what metals you can TIG weld Read More
Simple Decision Rule
- If you only weld thin steel → 120V is best TIG welder for you.
- If you want aluminum or thicker material → Get dual voltage and install 240V.
- If you want long-term value → Choose a 180–200A AC/DC machine and plan for 240V access.
Bottom Line for Beginners
If you only plan to weld thin steel in a small garage with no 240V outlet, a 120V TIG welder can work.
But if you:
- Want aluminum capability
- Want to weld thicker material
- Want stable arc performance
- Want to avoid upgrading later
Choose a dual-voltage AC/DC TIG welder and run it on 240V whenever possible.
It gives you power, flexibility, and long-term value.
Common Beginner Buying Mistakes (And How to Avoid Them)
Beginners often make avoidable mistakes when choosing their first TIG welder — and those mistakes can lead to frustration, wasted money, and early upgrades. Here’s what to watch out for:
1. Buying a DC-Only Welder and Regretting It
Mistake: Choosing a cheaper DC-only machine to save money.
Problem:
DC machines are great for mild steel and stainless, but they cannot weld aluminum properly. Once beginners try aluminum, they end up upgrading sooner — often spending more in the long run.
Solution:
If you plan to weld aluminum even occasionally, choose an AC/DC TIG welder from the start.
2. Ignoring Voltage Requirements
Mistake: Buying a dual voltage machine but running it only on 120V without understanding limitations.
Problem:
120V power is fine for thin steel, but it struggles with thicker steel and aluminum, leading to breaker trips, weak arcs, and poor results.
Solution:
Understand garage power first (120V vs 240V). If you want versatile performance, prepare for 240V use.
3. Choosing Amperage Too Low
Mistake: Buying a lower-amp machine (e.g., 140–160A) thinking it’s “good enough.”
Problem:
Lower amps limit your ability to weld thicker materials, and the machine may overheat quickly — especially with longer welds.
Solution:
Aim for 180–200 amps for a balance of power and versatility.
4. Overlooking the Duty Cycle
Mistake: Not checking the duty cycle spec before buying.
Problem:
Duty cycle determines how long your machine can weld before resting. A low duty cycle means frequent pauses, slower learning, and more frustration.
Solution:
Look for higher duty cycles at your typical welding amperage (especially if you plan on aluminum or thicker steel).
5. Buying Without a Foot Pedal
Mistake: Opting for a basic start-only TIG welder without foot pedal control.
Problem:
TIG welding requires heat control. Without a foot pedal, beginners struggle to adjust amperage “on the fly,” reducing weld quality.
Solution:
Choose a machine that includes a foot pedal or add one if possible.
6. Believing All TIG Welders Are the Same
Mistake: Assuming brand names or similar wattage means similar performance.
How to Avoid Outgrowing Your First TIG Welder
One of the biggest beginner frustrations is upgrading too soon.
Many people buy:
• A cheap DC-only machine
• Low amperage model
• 120V-only welder
Six months later they want:
• Aluminum capability
• More power
• Better duty cycle
And they end up buying a second machine.
The Smart Beginner Strategy
If possible:
✔ Choose 180–200 amps
✔ Choose AC/DC
✔ Choose dual voltage
✔ Plan for 240V access
It costs more upfront — but saves money long term.
Think of it as buying once instead of buying twice.
Final Recommendations: Which TIG Welder Should You Buy?
- Serious beginner wanting one machine to grow with: PrimeWeld TIG225X — best overall AC/DC capability, pulse, foot pedal, updated AC controls.
- Best value for control and versatility: AHP Alpha-TIG 225Xi — AC/DC with strong features for buyers who want more control.
- Want aluminum on a tighter budget: LOTOS TIG220AC/DC — AC/DC flexibility without premium pricing.
- Multi-function in one machine: SSimder 250 A 6-in-1 — AC/DC TIG, Pulse, Spot, and Stick in a single unit.
- Steel and stainless only, tight budget: YESWELDER TIG-205P — reliable DC performance, but no aluminum.
- Best value range for most beginners: $800–$1,100 tier offers AC/DC versatility, dual voltage, and room to grow.
- Long-term investment: $1,200+ tier delivers premium inverter tech, better duty cycle, and advanced AC balance for frequent aluminum work.
- Key mistake to avoid: Don’t assume similar amperage means similar performance—read real reviews, compare specs, and choose reputable models with stable arcs and good support.
Pingback: TIG Welding Settings Chart for 5 Different Materials