
If your welding rods keep sticking, your welds look weak, or you constantly burn holes through metal, your amperage settings are probably wrong.
Learning how to set amperage on a stick welder is one of the biggest beginner challenges because different welding rods, metal thicknesses, and welding positions all require different settings.
The good news?
Once you understand a few simple rules, stick welding settings become much easier to control.
In this beginner-friendly guide, you’ll learn:
- How stick welder amperage works
- Recommended stick welding amps chart
- Stick welding settings for 7018, 6013, and 6011 rods
- Welding amps to metal thickness chart
- Stick welder settings for 1/4 steel
- Common beginner mistakes
- How to know if your amperage is correct
- Real workshop tips beginners wish they knew earlier
For most beginner stick welding projects using 3/32″ E6013 rods, a starting amperage of 80–90A works well on 1/8″ mild steel. Thin metal requires lower amperage, while thicker steel needs higher heat and often performs better on 220V power.
If you are completely new to welding, also read my guide on How to Start Welding at Home before practicing your first weld.
What Does Amperage Mean in Stick Welding?
Amperage controls the heat output of your stick welder.
Higher amperage creates:
- More heat
- Deeper penetration
- Faster melting
Lower amperage creates:
- Less heat
- Shallower penetration
- Slower puddle formation
In simple terms:
👉 Too little amperage = weak welds and sticking rods
👉 Too much amperage = excessive spatter and burn-through
The correct setting creates a stable arc and smooth weld puddle.
Why Beginners Struggle With Stick Welder Settings
Many beginners face these common problems:
- Rod keeps sticking to metal
- Weld bead sits on top without penetration
- Excessive sparks and spatter
- Burn-through on thin steel
- Difficult arc starts
- Ugly uneven welds
- Confusion about rod amperage charts
One of the biggest beginner mistakes is:
“Turning the amps higher will automatically improve welding.”
In reality, incorrect amperage is one of the fastest ways to ruin weld quality.
The 4 Main Factors That Affect Stick Welding Amperage
1. Electrode Size
Larger diameter rods need more amperage.
Examples:
- 3/32″ rod (2.4 mm) → Lower amps
- 1/8″ rod (3.2 mm) → Medium amps
- 5/32″ rod (4.0 mm) → Higher amps
2. Metal Thickness
Metal thickness plays a major role in selecting the correct stick welding amperage and input voltage.
Thin steel requires lower amperage to avoid burn-through and excessive heat distortion. For thinner sheets up to around 1/8″ (3 mm), most 110V stick welders usually perform well for beginner welding and light fabrication work.
Thicker steel requires higher amperage and deeper penetration to create strong welds. For metal thicker than 1/8″ to 3/16″ (3–5 mm), a 220V welder generally provides better arc stability, stronger penetration, and smoother welding performance—especially when using larger electrodes like 1/8″ (3.2 mm) E7018 rods.
3. Welding Position
Flat welding usually uses higher amperage.
Vertical and overhead welding normally require slightly lower settings for better puddle control.
4.Travel Speed
Even correct amperage can produce poor welds if travel speed is wrong.
- Moving too slowly increases heat buildup and burn-through
- Moving too fast reduces penetration and creates weak welds
Many beginners incorrectly increase amperage when the real issue is travel speed.
Stick Welding Amps Chart
6013 Welding Rod Amperage Chart
The E6013 rod is one of the best beginner electrodes because it offers:
- smoother arc starts
- easier slag removal
- forgiving puddle control
| Rod Size | Recommended Amperage |
|---|---|
| 1/16″ | 20–40A |
| 5/64″ | 40–70A |
| 3/32″ | 70–100A |
| 1/8″ | 90–130A |
| 5/32″ | 130–180A |
Stick Welding Settings for 7018
E7018 rods provide stronger welds but require better technique and stable amperage control.
| Rod Size | Recommended Amperage |
|---|---|
| 3/32″ | 70–110A |
| 1/8″ | 90–150A |
| 5/32″ | 140–220A |
Important beginner reality:
Many small 110V stick welders struggle to run larger 7018 rods properly, especially on thick steel.
E6011 Stick Welding Settings
E6011 rods are aggressive penetrating rods commonly used on rusty or dirty steel.
| Rod Size | Recommended Amperage |
|---|---|
| 3/32″ or 2.4 | 40–85A |
| 1/8″ or 3.18 mm | 75–125A |
| 5/32″ or 4.0mm | 110–160A |
E6011 usually creates:
- rougher arc
- more spatter
- deeper penetration
Welding Amps to Metal Thickness Chart
This welding amps to metal thickness chart gives beginners a safe starting point.
| Metal Thickness | Suggested Amperage |
|---|---|
| 1/16″ or 1.59 mm steel | 40–70A |
| 1/8″ or 3.18 mm steel | 70–100A |
| 3/16″ 4.76 mm steel | 90–140A |
| 1/4″ 6.35 mm steel | 120–180A |
| 3/8″ 9.53 mmsteel | 180A+ |
These settings vary depending on:
- rod type
- welding position
- machine quality
- travel speed
Stick Welder Settings for 1/4 Steel
One of the most searched beginner questions is:
“What stick welder settings should I use for 1/4 steel?”
For 1/4″ mild steel, beginners commonly use:
| Electrode | Recommended Amperage |
|---|---|
| 1/8″ E6013 | 110–130A |
| 1/8″ E7018 | 120–140A |
| 5/32″ E7018 | 140–180A |
For deeper penetration:
- use 220V if possible
- clean the metal properly
- bevel thicker joints when needed
How to Set Amperage on a Stick Welder (Step-by-Step)
Step 1: Choose the Correct Rod
Beginners should start with:
- E6013 rods
- 3/32 size
This setup is easier to control and more forgiving.
Step 2: Read the Rod Box
Most electrode boxes include a stick welding amps chart.
Example:
- 3/32 E6013 → 70–100A
Start near the middle:
👉 around 85A.
Step 3: Adjust for Metal Thickness
Thin metal:
- reduce amps slightly
Thick metal:
- increase amps gradually
Never immediately use maximum settings.
Step 4: Practice on Scrap Metal First
Experienced welders always test settings before welding real projects.
This helps avoid:
- burn-through
- poor penetration
- wasted rods
How to Know if Your Amperage Is Correct
This is where most beginners struggle.
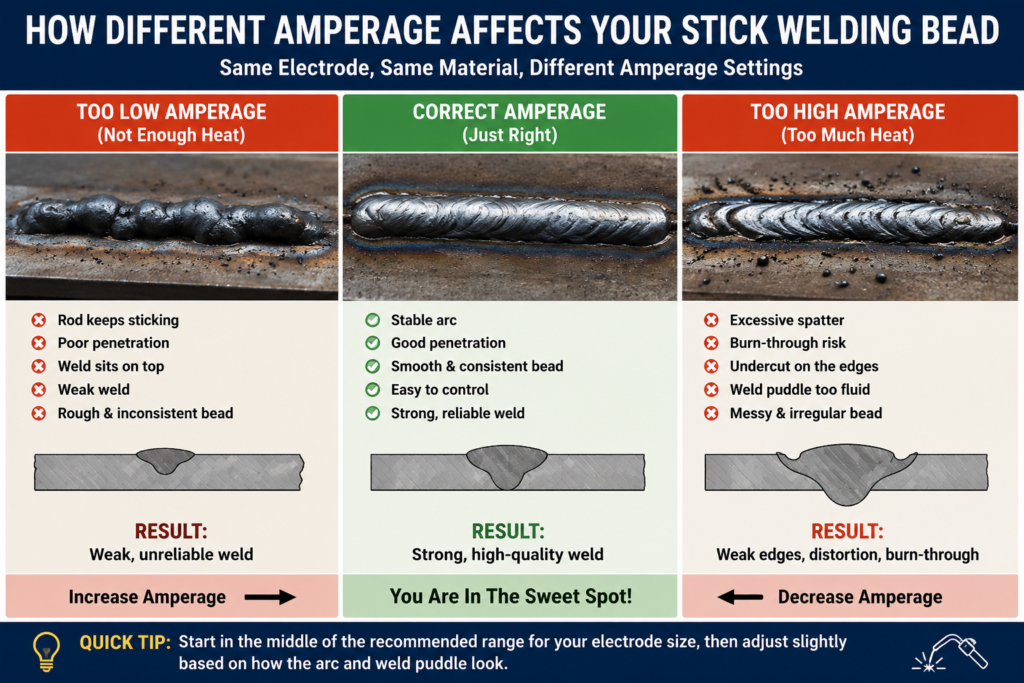
Signs Your Amperage Is TOO LOW
- Rod sticks constantly
- Weak unstable arc
- Poor penetration
- Weld bead sits high
- Difficult arc starts
Fix
👉 Increase amps slowly by 5–10A.
Signs Your Amperage Is TOO HIGH
- Excessive spatter
- Burn-through
- Undercut at weld edges
- Extremely fluid puddle
- Rod overheats quickly
Fix
👉 Reduce amperage gradually.
Signs Your Stick Welder Settings Are Correct
When your settings are right:
✅ Arc starts smoothly
✅ Rod does not stick excessively
✅ Weld puddle flows evenly
✅ Bead appears smooth and consistent
✅ Slag removes easier
✅ Penetration looks balanced
✅ Spatter stays manageable
This is the “sweet spot” every beginner should learn to recognize.
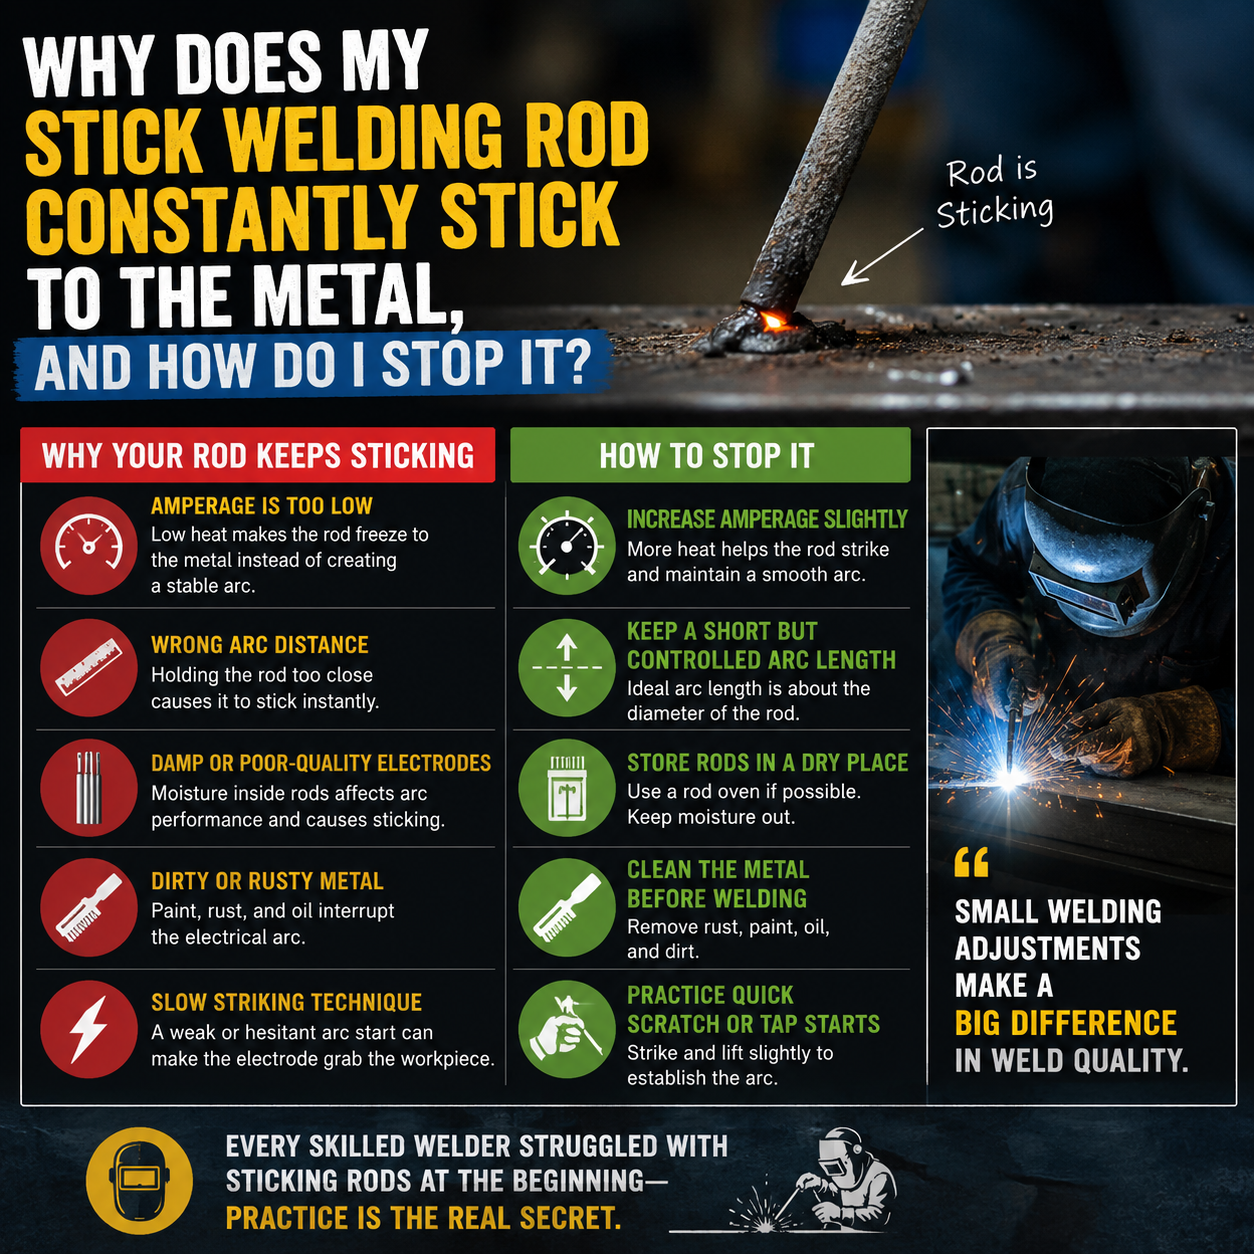
Also Read Why Does My Stick Welding Rod Keep Sticking to the Metal
Common Stick Welding Amperage Mistakes Beginners Make
1. Using Too Much Amperage
Many beginners think hotter equals better.
Result:
- burn-through
- excessive spatter
- ugly welds
2. Ignoring Electrode Size
Small rods cannot handle extremely high amperage.
This overheats electrodes quickly.
3. Welding Thin Steel Too Hot
Thin metal burns through easily.
Reduce heat and move faster.
4. Copying Random YouTube Settings
Every welder behaves differently.
90A on one machine may not feel the same on another welder.
Especially:
- cheap inverter welders
- 110V welders
- transformer welders
5. Not Adjusting for Welding Position
Vertical welding usually needs lower amps than flat welding.
Real Workshop Truth Beginners Should Know
In welding workshops, beginners often blame the welder when welds look bad.
But most problems come from:
- incorrect amperage
- bad travel speed
- poor rod angle
- inconsistent arc length
Even a budget welder can produce excellent welds when settings are adjusted properly.
Important Beginner Reality About Cheap Welders
Budget welders may:
- display inaccurate amperage
- fluctuate under load
- struggle with larger rods
- perform weaker on 110V power
That’s why experienced welders focus more on:
- puddle behavior
- arc sound
- penetration
—not just the digital display number.
Extension Cord Warning
Long or undersized extension cords can reduce welder performance and cause unstable arcs, especially on 110V machines.
Best Beginner Stick Welding Setup
If you are learning for the first time:
| Setting | Recommendation |
|---|---|
| Rod Type | E6013 |
| Rod Size | 3/32″ |
| Amperage | 80–90A |
| Material | 1/8″ mild steel |
| Position | Flat |
This setup is beginner-friendly and forgiving.
Stick Welding Amperage Calculator (Simple Rule)
Many beginners search for a “stick welding amperage calculator.”
A simple beginner rule is:
👉 Start with approximately 1 amp per 0.001 inch of rod diameter.
Example:
- 1/8″ rod = about 125A starting point
Then fine-tune based on:
- puddle behavior
- penetration
- rod performance
Final Thoughts
Learning stick welder settings takes practice, but understanding amperage is one of the fastest ways to improve your weld quality.
Most beginners struggle because they:
- use incorrect heat
- choose the wrong rod
- ignore metal thickness
- copy random settings online
Start simple:
- use E6013 rods
- practice on scrap metal
- adjust amps gradually
- watch the puddle carefully
That’s how real welding skill develops.
Quick Beginner Stick Welding Settings Cheat Sheet
| Rod | Size | Beginner Amps |
|---|---|---|
| E6013 | 3/32″ | 80–90A |
| E6013 | 1/8″ | 100–120A |
| E7018 | 3/32″ | 90–100A |
| E7018 | 1/8″ | 120–140A |
| E6011 | 3/32″ | 75–85A |
Can low amperage cause slag problems?
Yes. Low amperage can create poor penetration and make slag harder to remove from the weld bead.
Why does my 7018 rod keep sticking?
7018 rods usually stick because the amperage is too low, the arc length is too short, or the welder lacks enough power.
Can I weld 1/4″ steel with a 110V welder?
Yes, but penetration may be limited. Multiple passes and proper joint preparation are often required.
What amperage should I use for vertical stick welding?
Vertical welding usually needs 5–15 amps lower than flat-position welding for better puddle control.
Why does my weld bead sit on top of the metal?
This usually means poor penetration caused by low amperage, fast travel speed, or incorrect welding technique.
What amperage should I use for stick welding 1/4 steel?
For 1/4″ mild steel:
1/8″ E7018 → 120–140A
1/8″ E6013 → 110–130A
220V power usually performs better for thicker steel.
Why does my welding rod keep sticking?
Rod sticking is commonly caused by:
low amperage, short arc length, poor grounding, damp electrodes
What Should a Correct Stick Welding Arc Sound Like?
A properly adjusted stick welder usually produces a steady sizzling or frying sound. If the arc keeps cutting out, sticking, or sounding violent and erratic, your amperage may need adjustment.