What is TIG Welding
TIG welding, also known as Tungsten Inert Gas welding (GTAW), is a precise and high-quality welding process used to join metals using a non-consumable tungsten electrode and shielding gas. Many beginners often search what is TIG welding, what is the meaning of TIG welding, or what is the full form of TIG welding: when starting their learning journey. TIG is a slang word: stands for Tungsten Inert Gas, and it is widely known for producing clean, strong, and visually appealing welds. Unlike other welding processes, TIG welding gives the welder greater control over heat input and filler metal, making it ideal for welding thin materials, stainless steel, and aluminum. It is commonly compared with other methods, especially when learners try to understand what is MIG and TIG welding or the difference between MIG and TIG welding. With advancements in technology, modern variations such as lift TIG welding, pulse TIG welding, cold TIG welding, and TIP TIG welding have further improved efficiency, arc control, and weld quality for both beginners and professionals. TIG welding for beginners will give compelte step by step soultion of all the problems that beginners face.
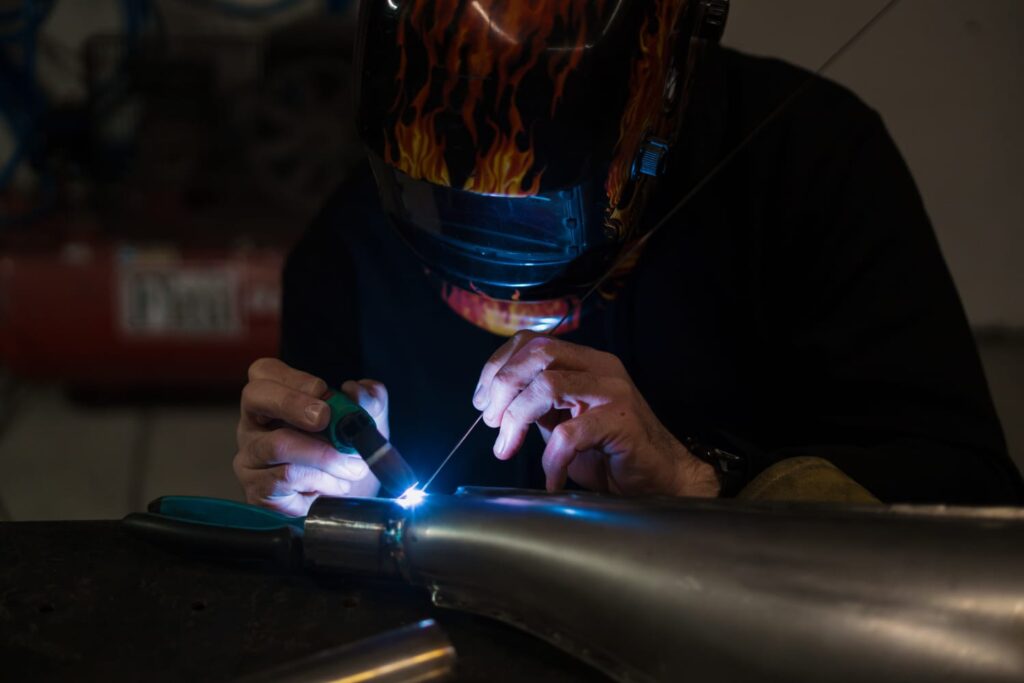
Table of Contents
What Is Meant by TIG Welding? (Quick Definition)
TIG welding for beginners is a precise welding method that uses a non-consumable tungsten electrode and argon shielding gas to produce clean, strong welds.
The full form of TIG welding is Tungsten Inert Gas welding.
• Tungsten – Refers to the non-consumable electrode used to create the welding arc.
• Inert Gas – Refers to shielding gases such as argon or helium that protect the weld area from atmospheric contamination.
This complete beginner TIG welding guide explains TIG welding process, tools, setup, techniques, safety, and beginner projects step by step.
How TIG Welding Works (Process Overview)
How Does TIG Welding Work?
TIG welding for beginners can seem challenging at first, but with the right guidance, tools, and setup, anyone can learn this precise and high-quality welding process.
TIG welding (Tungsten Inert Gas welding) is a precision welding process that creates an electric arc between a non-consumable tungsten electrode and the base metal. The arc generates intense heat that melts the edges of the metal to form a weld pool. An inert shielding gas, typically argon, protects the molten metal from oxygen and contamination. When additional strength is required—especially for thicker materials—a separate filler rod is manually fed into the weld pool to reinforce the joint.
TIG welding basics for beginners
Step-by-Step TIG Welding Process for beginners
If you’re wondering how TIG welding works, here is a simple step-by-step breakdown of the TIG welding process explained clearly for beginners.
1. Power Supply Creates the Electric Arc
When the TIG torch trigger or foot pedal is activated, electrical current flows from the welding machine to the non-consumable tungsten electrode.
An electric arc forms between the sharpened tungsten tip and the base metal (the metal being welded). This arc produces extremely high heat — often exceeding 3,000°C (5,400°F).
This intense heat:
- Melts the base metal weld area
- Creates a controlled weld pool
- Does NOT melt the tungsten electrode
Because the electrode does not melt, TIG welding provides exceptional control and precision.
2. Shielding Gas Protects the Weld Pool
At the same time, an inert shielding gas — usually argon — flows through the torch nozzle.
The shielding gas:
- Protects the molten weld pool from oxygen and nitrogen
- Prevents porosity and oxidation
- Keeps the tungsten electrode from contamination
- Produces clean, high-quality welds
Without proper shielding gas coverage, the weld would become weak, brittle, and contaminated.
3. Filler Metal Is Added (If Required)
Unlike MIG welding, TIG welding uses a separate filler rod.
The welder:
- Holds the TIG torch in one hand
- Feeds the filler rod with the other hand
This two-hand technique gives the welder complete control over:
- Heat input
- Filler amount
- Weld bead appearance
Because of this precision control, TIG welding is ideal for thin metals, stainless steel, aluminum, and detailed fabrication work.
4. Weld Pool Formation and Solidification
As the arc moves along the joint:
- The base metal melts and forms a small weld pool
- The filler rod melts into the pool (if used)
- The molten metal cools and solidifies behind the torch
The result is:
- A strong fusion bond
- A smooth, visually clean weld bead
- Minimal spatter
This controlled melting and solidification process is what makes TIG welding one of the highest-quality welding methods available.
Simple Formula to Remember
Electric Arc + Non-Consumable Tungsten Electrode + Shielding Gas + Optional Filler Rod = High-Quality TIG Weld
Does TIG welding always require filler metal?
No. Thin materials can be welded without filler metal. This is called autogenous welding.
TIG Welding for Beginners Setup Guide
TIG Welding Machine Setup Guide for MIld steel (Step-by-Step for Beginner
One of the most common beginner questions is:
• How do I set up a TIG welder?
• What settings should I use for TIG welding?
• How do I prepare my TIG machine before starting?
If your machine is not set up correctly, even perfect technique will not produce good welds.
This simple step-by-step TIG welding guide will help you set up your TIG welding machine properly and safely for MIld Steel.
Step 1: Choose the Correct Current Type (AC or DC)
The first and most important setting is selecting the correct current.
Use DC (Direct Current) for:
- Mild steel
Beginner Tip:
If you are just starting, practice on mild steel using DC mode.
Step 2: Select the Correct Polarity
For most TIG welding applications, use:
DCEN (Direct Current Electrode Negative)
This means:
- The tungsten electrode is negative
- The work clamp is positive
DCEN provides:
- Deeper penetration
- Stable arc
- Less heat on tungsten
Step 3: Set the Amperage (Heat Setting)
A simple rule for beginners:
You need approximately 1 amp per 0.001 inch of metal thickness.
Examples:
- 1/16 inch steel (0.062″) → about 60 amps
- 1/8 inch steel (0.125″) → about 125 amps
If using a foot pedal:
Set the machine slightly higher than needed and control heat with your foot.
Beginner Mistake to Avoid:
Do not start with very high amperage. Too much heat causes:
- Burn-through
- Warping
- Wide messy weld beads
Step 4: Install and Prepare the Tungsten Electrode
Your tungsten must match the material and amperage.
Recommended for beginners:
2% Lanthanated (Blue or Gold)
Common size:
3/32 inch (most versatile beginner size)
How to sharpen tungsten:
- Grind lengthwise (not sideways)
- Create a sharp, clean point for DC welding
- For aluminum (AC), use a slightly rounded tip
A properly sharpened tungsten gives:
- Stable arc
- Better control
- Cleaner weld appearance
If the tungsten touches the weld pool, stop and regrind immediately.
Step 5: Connect the Shielding Gas (100% Argon)
TIG welding requires pure argon gas.
Never TIG weld without shielding gas.
Proper setup:
- Secure argon cylinder upright
- Attach flowmeter regulator
- Connect gas hose to machine
- Set flow rate to 15–20 CFH
Too much gas → turbulence
Too little gas → contamination
If your weld turns gray or porous, check your gas flow first.
Step 6: Install the TIG Torch Components Properly
Inside your torch you will install:
- Collet
- Tungsten electrode
- Collet body or gas lens
- Ceramic cup
- Back cap
Make sure:
- Tungsten sticks out about 1/8 to 1/4 inch from the cup
- All parts are tightened properly
- No gas leaks are present
Beginner Upgrade Tip:
A gas lens improves shielding coverage and arc stability.
Step 7: Connect the Ground Clamp Correctly
The ground clamp must:
- Be attached to clean metal
- Have solid contact
- Not be connected to rust, paint, or oil
Poor grounding causes:
- Arc instability
- Hard starts
- Weak welds
Always grind a small clean area for the clamp.
Step 8: Check Foot Pedal or Trigger Settings
If using a foot pedal:
- Set maximum amperage on machine
- Control heat with your foot
- Press gradually to start
Foot pedal control allows:
- Better puddle control
- Smoother starts
- Reduced burn-through
For beginners, a foot pedal dramatically improves weld quality.
Step 9: Perform a Dry Run Before Welding
Before striking an arc:
- Check gas flow
- Confirm current type
- Confirm amperage setting
- Inspect tungsten tip
- Verify ground connection
Doing this prevents 90% of beginner problems.
Quick Beginner Setup Checklist
Before starting TIG welding, confirm:
✓ Correct current type (AC or DC)
✓ Proper amperage set
✓ Sharpened tungsten installed
✓ Argon gas flowing (15–20 CFH)
✓ Clean base metal
✓ Proper grounding
✓ Protective gear on
If all boxes are checked, you are ready to strike an arc.
Quick Mild Steel TIG Setup Summary (Beginner Reference Table)
| Setting | Recommended Setup |
| Polarity | DCEN (DC -) |
| Tungsten Type | 2% Lanthanated |
| Tungsten Size | 3/32″ |
| Shielding Gas | 100% Argon |
| Gas Flow | 15–20 CFH |
| Filler Rod | ER70S-2 |
| Torch Angle | 10–15° push |
| Amperage Rule | 1 amp per 0.001″ thickness |
This setup provides stable arc control and smooth learning.
Common Beginner Setup Mistakes
- Using AC on steel
- Forgetting to turn on gas
- Too much amperage
- Dirty base metal
- Loose ground clamp
- Incorrect tungsten preparation
Most TIG welding problems are setup-related — not skill-related.
Why TIG Welding for Beginners Is Worth Learning
TIG welding has become one of the most popular welding processes for beginners because it offers precision, control, and high-quality results that are difficult to achieve with other welding methods. Many learners search for “tig welding for beginners” or “why choose tig welding” when deciding which welding process to start with. Unlike MIG welding, TIG welding allows better control over heat input, weld bead appearance, and filler metal placement, making it ideal for thin materials, stainless steel, and aluminum.
For beginners, TIG welding also offers:
- Cleaner and stronger welds – The inert gas shielding prevents contamination, resulting in visually appealing and structurally sound welds.
- Greater control over the welding process – Beginners can slowly build skill and confidence with torch handling, arc length, and filler rod technique.
- Versatility – TIG can weld a variety of metals including steel, stainless steel, aluminum, and copper alloys.
- Learning foundation for advanced welding – Mastering TIG equips beginners with skills that can be applied to professional welding projects.
Many new welders also compare TIG and MIG, asking “tig vs mig for beginners.” While MIG welding is faster and easier for thicker materials, TIG welding is preferred for those who want precision, high-quality results, and the ability to weld a variety of metals.
Overall, beginners choose TIG welding because it provides a combination of control, quality, and versatility that sets the foundation for developing expert welding skills.
Where TIG Welding Is Used
TIG is a top choice in fields where welds must be clean, strong, and reliable:
- Automotive and motorsports
- Food-grade stainless steel piping
- Marine and shipbuilding
- Medical equipment manufacturing
- Artistic and custom metalwork
- Repair work on thin and exotic metals
- Aerospace fabrication
You’ll find TIG welds in everything from aircraft parts to kitchen equipment and high-end custom metal art.
TIG vs MIG Welding for Beginners
Choosing the right welding process as a beginner depends largely on the type of material you want to weld and the application. Both TIG and MIG welding are popular, but they serve different purposes and skill levels. Many beginners ask, “tig vs mig for beginners” or “which welding method should I start with?” Here’s a clear comparison to guide you.
| Feature | TIG Welding | MIG Welding | Best Use / Material for Beginners |
|---|---|---|---|
| Precision | Very high | Moderate | TIG is ideal for thin metals and projects requiring clean, detailed welds. MIG is better for thicker metals where speed matters. |
| Skill Required | High | Low | Beginners with patience can learn TIG for precision. MIG is easier to pick up quickly. |
| Material Types | Steel, stainless steel, aluminum, copper alloys | Steel, stainless steel, mild steel | TIG excels on aluminum and stainless steel. MIG is great for mild steel and general fabrication. |
| Speed | Slower | Faster | MIG is preferred for production or thicker materials; TIG is slower but produces cleaner welds. |
| Filler Metal Control | Manual | Automatic (wire feed) | TIG allows precise control over filler placement. MIG feeds wire automatically, less manual skill needed. |
| Weld Appearance | Clean and visually appealing | Functional, less aesthetic | TIG is preferred for show-quality or visible welds. MIG is fine for structural or hobby projects. |
| Equipment Cost | Higher | Moderate | TIG machines are generally more expensive. MIG welders are beginner-friendly and often portable. |
Key Takeaways for Beginners
- If you want precision, clean welds, or to weld aluminum or stainless steel: TIG welding is the best choice.
- If you want speed, easier learning, and welding thicker mild steel: MIG welding is better for beginners.
- Project Type Matters: TIG is preferred for artistic or detailed projects, TIG for automotive repair, and thin sheet metal. MIG is preferred for structural steel, general fabrication, or home DIY projects.
Materials Suitable for TIG Welding (What Metals Can TIG Weld?)
One of the most common beginner questions is: What metals can TIG welding be used on?
TIG welding is extremely versatile and can weld both ferrous and non-ferrous metals when proper settings and filler rods are used.
| Metal | Current | Beginner Level | Best Filler |
|---|---|---|---|
| Mild Steel | DC | Easy | ER70S-2 |
| Stainless Steel | DC | Easy–Medium | ER308L |
| Aluminum | AC | Medium | ER4043 |
| Copper | DC | Medium | ERCu |
| Titanium | DC | Advanced | ERTi-2 |
For a detailed guide Read What Metals Can You TIG weld
TIG Welding Tools and Equipment for Beginners
TIG welding (GTAW) demands precision—and that starts with selecting the right welding machine. Whether you’re a beginner or an experienced welder, knowing how to choose the appropriate equipment is crucial to mastering the craft. Unlike MIG welding, TIG uses a non-consumable tungsten electrode and a separate filler rod fed by hand, which means your equipment setup directly affects weld quality.
If you choose the right tools from the beginning, TIG welding becomes easier, safer, and far less frustrating.
Below is everything a beginner needs to buy, understand, and start TIG welding confidently.
1. TIG Welding Machine (TIG Welder)
Your TIG welder is the heart of your setup. A TIG welding machine (Power Source) provides the electrical current needed to create an arc between a non-consumable tungsten electrode and the workpiece. It also integrates features for:
- Current control (amperage),
- Gas flow control (argon),
- Polarity settings (AC/DC),
- Pulse modes (optional, for advanced work),
- High-frequency start (for non-contact ignition).
Beginners often make the mistake of buying either too small or unnecessarily expensive machines.
Types of TIG Welding Machines
| Type | Description | Best For |
| AC TIG Welders | Use Alternating Current; essential for welding aluminum and magnesium | Aluminum, magnesium, auto and aerospace applications |
| DC TIG Welders | Use Direct Current; ideal for steel, stainless steel, copper, etc. | Steel fabrication, stainless, mild steel work |
| AC/DC TIG Welders | Offer both modes; versatile for all materials | Professionals and serious hobbyists |
| Inverter-Based Machines | Lightweight, energy-efficient, precise control, often with pulsed TIG features | Home workshops, mobile jobs, fine or artistic welds |
| Transformer-Based Machines | Heavy-duty, durable, lower cost but less portable | Industrial or workshop use where mobility isn’t needed |
What Type of TIG Welder Should a Beginner Buy?
For most beginners:
- DC TIG welder → Best for steel and stainless steel
- AC/DC TIG welder → Required if you want to weld aluminum
If your goal includes aluminum welding, buy an AC/DC machine from the start. Otherwise, you will need to upgrade later.
Recommended Amperage Range
For home and beginner use:
- 140–200 amps is ideal
- 200 amps gives flexibility for thicker materials
Rule of thumb:
You need approximately 1 amp per 0.001 inch of material thickness.
Example:
- 1/8 inch steel (0.125″) ≈ 125 amps
120V vs 240V (Very Important)
- 120V machines are convenient for home garages
- 240V provides better arc stability and higher amperage capacity
If you are serious about TIG welding, a dual-voltage (120V/240V) machine is a smart investment.
Foot Pedal vs Lift Arc
- Foot pedal → Gives precise heat control (strongly recommended)
- Lift arc start → More basic, less control
For beginners, a foot pedal dramatically improves learning speed and weld quality.
What Size TIG Welder Is Best for Beginners?
A 180–200 amp AC/DC TIG welder with dual voltage and foot pedal control is ideal for most beginners because it allows welding steel, stainless steel, and aluminum without upgrading later.
2. TIG Torch (Air-Cooled vs Water-Cooled)
The TIG torch holds the tungsten electrode and directs shielding gas.
Basic Parts and How It Works
A standard TIG torch includes:
- Torch body – the main handle and housing.
- Tungsten electrode – produces the arc.
- Collet and collet body – holds the tungsten firmly.
- Gas lens or standard collet body – spreads shielding gas evenly.
- Ceramic cup or nozzle – focuses the gas around the weld area.
- Back cap – locks the tungsten in place.
- Gas hose and power cable – connect to the machine.
- Cooling system – either air-cooled or water-cooled, depending on the model.
When the torch is activated, the current passes through the tungsten, creating an arc. Argon gas flows through the torch, shielding the arc and molten metal.
Air-Cooled Torch (Best for Beginners)
- Simpler setup
- Lower cost
- No water cooler required
- Suitable up to about 200 amps
Most beginners should choose an air-cooled torch.
Water-Cooled Torch
- Used in industrial environments
- Required for high amperage (250+ amps)
- More expensive
- Requires cooling unit
Common Torch Sizes
- WP-17 → Most common, durable
- WP-26 → Larger, handles higher amperage
- WP-9 → Smaller, lightweight
For beginners, a WP-17 air-cooled torch is reliable and versatile.
What TIG Torch Should a Beginner Use?
A WP-17 air-cooled torch with a gas lens kit provides the best balance of durability, control, and cost for beginner TIG welding.
3. Tungsten Electrodes (The Most Confusing Part for Beginners)
The tungsten electrode creates the arc but does not melt like a MIG wire.
Choosing the correct tungsten affects arc stability and weld appearance.
Common Tungsten Types
- 2% Thoriated (Red) → Traditional DC welding (less common today due to health concerns when grinding)
- 2% Ceriated (Gray) → Excellent for low-amperage DC
- 2% Lanthanated (Blue or Gold) → Very versatile, works on AC and DC (best all-around choice)
Best Tungsten for Beginners
If you want one tungsten type that works in most situations:
Choose 2% Lanthanated.
It works well on:
- Mild steel
- Stainless steel
- Aluminum (with AC)
Tungsten Diameter Guide
- 1/16″ → Thin materials
- 3/32″ → Most common beginner size
- 1/8″ → Thicker materials
For general learning, 3/32” tungsten is ideal.
Why Is Tungsten Sharpening Important?
A properly sharpened tungsten produces:
- Stable arc
- Better penetration
- Cleaner weld bead
Always grind tungsten lengthwise, not sideways.
4. Shielding Gas (100% Argon Only)
TIG welding requires shielding gas to protect the weld from contamination.
What Gas Is Used in TIG Welding?
100% Argon is used for most TIG welding applications.
Unlike MIG welding, TIG does not use CO₂ mixtures for steel.
Recommended Gas Flow Rate
- 15–20 CFH (Cubic Feet per Hour) for most jobs
- Too high → turbulence
- Too low → contamination
Do You Need a Gas Regulator?
Yes. You need:
- Argon cylinder
- Flowmeter regulator
- Proper gas hose connections
Never try TIG welding without shielding gas — you will damage the tungsten and contaminate the weld instantly.
Can You TIG Weld Without Gas?
No. TIG welding requires shielding gas to prevent oxidation and contamination. Without gas, the weld will fail immediately.
5. Filler Rods
Unlike MIG welding, TIG uses a separate filler rod added manually.
The filler rod must match your base metal.
Common Filler Rods for Beginners
- ER70S-2 → Mild steel
- ER308L → Stainless steel
- ER4043 → Aluminum
Always confirm compatibility between filler rod and base metal.
Store filler rods in a clean, dry environment to prevent contamination.
6. Safety Equipment for TIG Welding
Even though TIG produces less spatter than other welding processes, safety is still critical.
Essential Safety Gear
- Auto-darkening welding helmet (shade 9–13)
- TIG welding gloves (thin, flexible leather)
- Flame-resistant jacket
- Closed leather boots
- Safety glasses
Ventilation
TIG produces less smoke than flux processes, but proper ventilation is still necessary — especially when welding stainless steel or coated metals.
7. Essential Accessories Beginners Often Forget
Many new welders struggle not because of skill — but because they overlook small accessories.
Must-Have Accessories
- Gas lens kit (improves gas coverage)
- Extra collets and ceramic cups
- Tungsten sharpener or dedicated grinding wheel
- Ground clamp with solid contact
- Welding table or metal workbench
- Clamps for positioning
A gas lens is one of the most underrated upgrades for beginners — it provides smoother gas flow and better arc stability.
How Much Does TIG Welding Equipment Cost?
For beginners in the USA:
- Entry-level AC/DC TIG welder → $700–$1,500
- Argon tank setup → $250–$400
- Accessories and safety gear → $200–$400
Total beginner setup range:
$1,200 – $2,200 depending on quality and brand.
What Equipment Do I Need to Start TIG Welding?
To start TIG welding, you need:
- AC/DC TIG welding machine
- Air-cooled TIG torch
- Tungsten electrodes
- 100% argon gas cylinder
- Flowmeter regulator
- Filler rods
- Welding helmet and protective gear
With these tools properly set up, you can begin practicing immediately.
Common TIG Welding for Beginners Mistakes and How to Avoid Them
TIG welding has a steep learning curve. Most beginners struggle not because TIG is difficult — but because they repeat a few common mistakes.
Here are the biggest beginner errors and how to fix them:
1. Contaminating the Tungsten
Problem:
Touching the tungsten to the weld puddle or filler rod.
Result:
Unstable arc, dirty weld, black contamination.
Fix:
- Keep tungsten 1/8 inch from puddle
- Regrind immediately if contaminated
- Maintain steady hand control
Pro Tip: If your arc suddenly becomes unstable, check your tungsten first.
2. Using Too Much Amperage
Problem:
Beginners often set amps too high.
Result:
Burn-through, warped metal, wide messy bead.
Fix:
- Follow the 1 amp per 0.001 inch rule
- Use a foot pedal to control heat dynamically
3. Poor Gas Coverage
Problem:
Incorrect gas flow rate or leaks.
Result:
Porosity, gray weld bead, oxidation.
Fix:
- Use 15–20 CFH for most jobs
- Install a gas lens for smoother flow
- Check for hose leaks
4. Incorrect Torch Angle
Problem:
Holding torch too steep or too flat.
Correct Angle:
10–15° push angle
Improper angle causes uneven penetration and poor shielding.
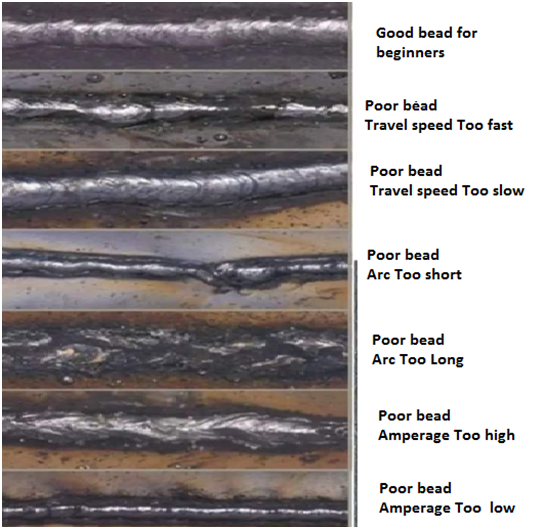
5. Moving Too Fast or Too Slow
Too fast → No penetration
Too slow → Overheating
Good TIG welding looks like stacked dimes with consistent spacing.
6. Dirty Base Metal
TIG welding demands clean metal.
Always:
- Remove oil
- Remove paint
- Remove rust
- Clean aluminum oxide with stainless steel brush
Clean metal = clean weld.
What Is the Most Common TIG Welding Mistake?
The most common beginner mistake in TIG welding is contaminating the tungsten electrode by dipping it into the weld puddle.
TIG Welding Safety for Beginners
TIG welding is cleaner than MIG or Stick welding, but it is not risk-free. Beginners often underestimate arc radiation and gas hazards.
Below is a complete safety checklist.
1. Eye and Face Protection
TIG arc produces intense UV radiation.
Use:
- Auto-darkening helmet (Shade 9–13)
- Safety glasses under helmet
Without protection, you risk arc eye (welder’s flash).
2. Proper Gloves
TIG gloves must be:
- Thin
- Heat-resistant
- Flexible
Heavy MIG gloves reduce torch control.
3. Protective Clothing
Wear:
- Flame-resistant jacket
- Cotton or leather clothing
- Closed leather boots
Never wear synthetic fabric — it melts.
4. Ventilation
Although TIG produces minimal smoke, fumes from:
- Stainless steel
- Aluminum
- Coated metals
can still be harmful.
Use:
- Proper shop ventilation
- Fume extraction system when possible
5. Gas Cylinder Safety
Argon is inert but displaces oxygen.
Always:
- Secure cylinder upright
- Keep cap on when moving
- Store in ventilated area
6. Electrical Safety
- Ensure proper grounding
- Inspect cables regularly
- Avoid wet surfaces
Is TIG Welding Dangerous?
TIG welding is safe when proper protective equipment and ventilation are used, but it can cause eye damage, burns, and fume exposure if safety precautions are ignored.
For more details on TIG welding safety standards, beginners can refer to the OSHA Welding Safety guidelines.
TIG Welding for Beginners (Practice projects)
Once your TIG welding machine is properly set up for mild steel, the next step is hands-on practice keeping in view above safety measuers. Beginners often struggle with bead control, torch movement, and filler rod technique. Starting with simple exercises builds confidence and precision.
1. Bead-Making Practice (Straight Beads)
Bead practice is essential for learning torch control, travel speed, and puddle consistency.
Materials Needed:
- Mild steel scrap (16–18 gauge is ideal)
- ER70S-2 filler rod
- TIG welder set up as per previous guide
Steps for Bead Practice:
- Clean the metal – Remove rust, oil, paint, or mill scale.
- Position the scrap – Clamp it securely to your workbench.
- Hold the torch correctly – 10–15° push angle, tungsten 1/8 inch from the surface.
- Start the arc – Use the foot pedal to control amperage.
- Add filler rod – Feed small amounts steadily into the molten puddle.
- Move consistently – Keep a steady travel speed to form a smooth, “stacked dime” appearance.
- Inspect your bead – Look for uniform ripples, no porosity, and proper penetration.
Tip for Beginners:
Practice multiple beads on scrap until you can maintain a consistent arc, puddle, and ripple. This is the foundation for all future TIG welding projects.
2. Beginner Project: Simple Lap Joint
After practicing straight beads, it’s time to weld a small, simple project. A lap joint is ideal because it allows beginners to apply bead skills on a real joint without worrying about complex angles.
Materials Needed:
- Two pieces of mild steel, 6″ x 2″ x 1/8″ each
- TIG welder, ER70S-2 filler rod, 100% Argon
- Clamps to hold metal securely
Steps to Weld a Lap Joint:
- Clean both metal pieces – Ensure no rust, oil, or paint remains.
- Position the pieces – Overlap one piece on top of the other by ~1 inch. Clamp securely.
- Check torch angle – Keep 10–15° push angle.
- Strike the arc and start welding – Begin at one end of the joint.
- Feed filler rod slowly and steadily – Form a smooth, even bead along the overlap.
- Move consistently – Maintain even travel speed to avoid burn-through or gaps.
- Inspect the weld – Check for good penetration and a smooth bead.
- Clean up – Remove slag or any surface impurities after cooling.
Why Lap Joint is Perfect for Beginners:
- Simple geometry
- Teaches bead control on a real joint
- Reduces risk of mistakes like burn-through
- Prepares beginners for corner, butt, and T-joints
Tip: Practice multiple lap joints on scrap before moving to real projects. Focus on smooth beads, correct amperage, and clean weld appearance.
✅ Pro Tip: Start small and repeat. Your first TIG beads may look uneven — that’s normal. Repetition is the fastest way to improve. Always record your amperage, tungsten size, and travel speed to replicate successful settings.
If you’re serious about learning TIG welding for beginners, start with mild steel practice, master torch control, and gradually move toward aluminum projects.
TIG Welding for Beginners Cost Comparison Table
Below is a realistic beginner setup comparison based on US market averages:
| Equipment Level | Machine Type | Suitable For | Approximate Cost (USD) | Recommended For |
| Budget Setup | DC TIG 140–160A | Steel, Stainless | $500 – $800 | Hobby practice |
| Mid-Range Setup | AC/DC 180–200A | Steel + Aluminum | $800 – $1,500 | Serious beginners |
| Professional Entry | AC/DC 200A+ Inverter | All common metals | $1,500 – $2,500 | Small shop / advanced hobby |
Additional Costs:
| Item | Estimated Cost |
| Argon Tank Setup | $250 – $400 |
| Safety Gear | $200 – $400 |
| Filler Rods & Consumables | $100 – $200 |
How Much Does It Cost to Start TIG Welding?
A complete beginner TIG welding setup typically costs between $1,200 and $2,000 depending on machine quality and accessories.
Frequently Asked questions
What Is TIG Welding Best For?
TIG welding is best for precision welding on stainless steel, aluminum, titanium, and thin materials where clean, high-quality welds are required.
Is TIG Welding Hard for Beginners?
TIG welding is harder to learn than MIG welding because it requires coordination of torch, filler rod, and foot pedal, but it produces superior weld quality once mastered.
What Materials Can You TIG Weld?
TIG welding can join stainless steel, aluminum, mild steel, magnesium, titanium, copper alloys, and nickel alloys.
What Is the Best TIG Welder for Beginners?
The best TIG welder for beginners is a 180–200 amp AC/DC inverter machine with dual voltage and foot pedal control.