What is Stick Welding?
If you’re learning how to stick weld, this beginner-friendly guide will walk you through the entire process step by step in a simple and practical way. Whether you’re completely new or improving your skills, mastering the basics is the foundation for producing strong, reliable welds.
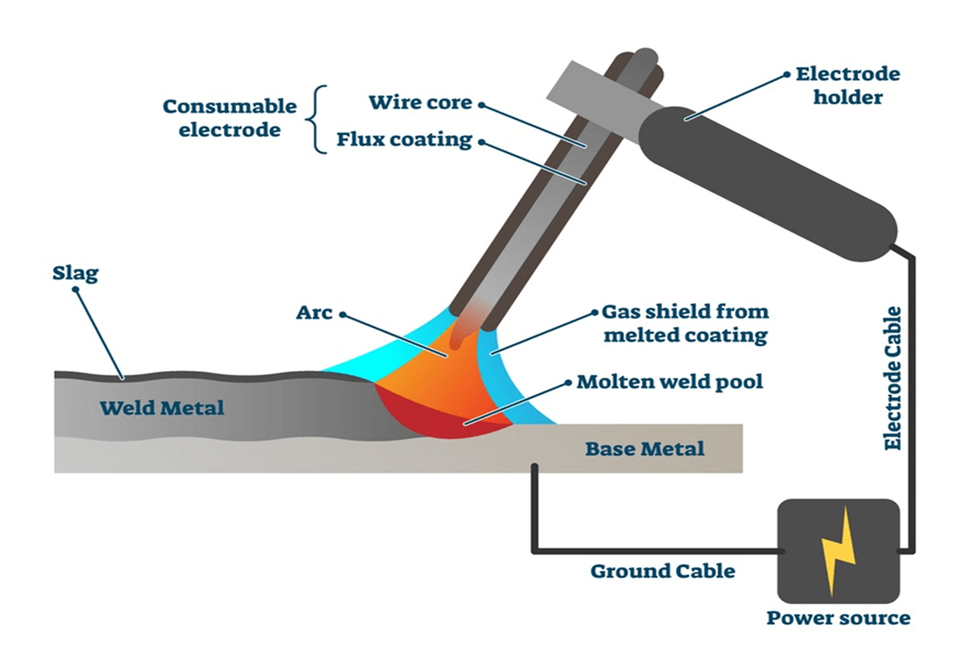
Stick welding, also known as Shielded Metal Arc Welding (SMAW), is one of the most widely used welding processes. It works by creating an electric arc between a flux-coated electrode and the base metal. The heat melts both materials, forming a durable joint.
What makes stick welding ideal for beginners is its simplicity and versatility. It requires minimal equipment, works outdoors, and performs well even on rusty or painted metal.
Table of Contents
🔹 Quick Stick Welding Safety Checklist
Before you begin, always follow these essential safety rules:
- Wear a proper welding helmet (correct shade)
- Use flame-resistant gloves and clothing
- Ensure proper ventilation
- Keep flammable materials away
- Inspect cables and equipment
- Work in a dry environment
- Use insulated tools
- Keep a fire extinguisher nearby
- Avoid direct exposure to arc light
- Ensure proper grounding
How to Stick Weld Step by Step (Beginner Guide)
To stick weld, set the correct amperage, attach the ground clamp securely, choose the right electrode, strike the arc, maintain a short arc length, and move steadily to create a consistent weld bead. After welding, remove slag and inspect the weld.
Follow These Ten Steps for How to Stick Weld beginners guide
- Set up your welding machine
- Attach the ground clamp properly
- Select the right electrode
- Set the correct amperage
- Prepare the metal surface
- Insert the electrode
- Strike the arc
- Maintain proper arc length
- Practice bead control
- Remove slag and inspect the weld
If you’re new to welding, this is exactly how I teach beginners how to stick weld in the workshop. Follow these steps carefully, and you’ll avoid most common mistakes.
How Do You Stick Weld: (10 Easy Steps for Beginners)
Step 1. Setting Up Your Welding Machine
Start by placing your welding machine on a stable, dry surface.
- Connect the electrode holder (stinger) to the positive (+) terminal
- Connect the ground clamp to the negative (–) terminal
👉This setup is called DCEP (Direct Current Electrode Positive), and it works best for beginners using E6013 rods.
Step 2. Attach the Ground Clamp Properly (VERY IMPORTANT)
This is where many beginners go wrong.
- Clamp it directly to the workpiece (metal) or welding table
- Make sure the surface is clean (no paint, rust, or oil)
- Ensure a tight connection
👉 Poor grounding causes weak arc and sticking rods.
Step 3. Select the Right Electrode
For beginners, always start with:
- E6013 electrode (2.5 mm / 3/32″)
Why?
- ✔ Easy to use
- ✔ Smooth arc
- ✔ Beginner-friendly
Step 4. Set the Correct Amperage
For mild steel bead practice:
- 2.5 mm E6013 → 90–110 amps
- 3.2 mm E6013 → 110–130 amps
👉 Start at lower amps, then adjust slightly:
- Rod sticking → increase amps
- Too much spatter → reduce amps
Step 5. Prepare the Metal (Don’t Skip This)
Before welding:
- Clean the surface using a wire brush or grinder
- Remove rust, paint, or oil
👉 Clean metal = better arc + stronger weld
Step 6. Insert the Electrode in Electrode holder
- Place the rod firmly in the electrode holder
- Keep about 25–30 mm rod length exposed
How to Hold the Electrode Holder (Stinger)
- Grip the holder firmly but stay relaxed
- Keep your wrist steady (avoid shaking)
- Use your other hand to support if needed (especially for beginners)
- Maintain a comfortable position to control movement smoothly
👉 Pro Tip: Don’t hold it too tight — a relaxed grip gives better control and smoother motion.
Step 7. Strike the Arc (Start Welding)
Most Importent Step for How to Stick weld for beginners.This is the most critical moment for beginners, as improper arc starting often leads to the rod sticking.
Correct Electrode Angle (Very Important)
- Hold the electrode at a 10°–15° drag angle
- Tilt it in the direction of travel (pulling, not pushing)
👉 Why this matters:
- Maintains a stable arc
- Improves weld bead shape
- Reduces spatter
👉 If rod sticks:
- Don’t panic
- Twist and release
- Increase amperage slightly
Two Common Arc Starting Methods:
1. Tap Method
- Lightly tap the electrode on the metal surface
- Immediately lift it slightly to create the arc
2. Scratch Method
- Drag the electrode across the surface like striking a match
- Lift gently once the arc starts
👉 If the rod sticks:
- Twist it slightly to release
- Increase amperage a little if sticking continues
Step 8. Maintain Proper Arc Length
- Keep arc gap around 2–3 mm
- (Same as rod diameter)
👉 Too long = weak arc
👉 Too short = sticking
🎯 Beginner Tips for Better Arc Control
- Keep arc length short (2–3 mm)
- Focus on the molten pool, not the bright arc
- Move slowly and steadily
- Practice arc striking multiple times before starting actual welding
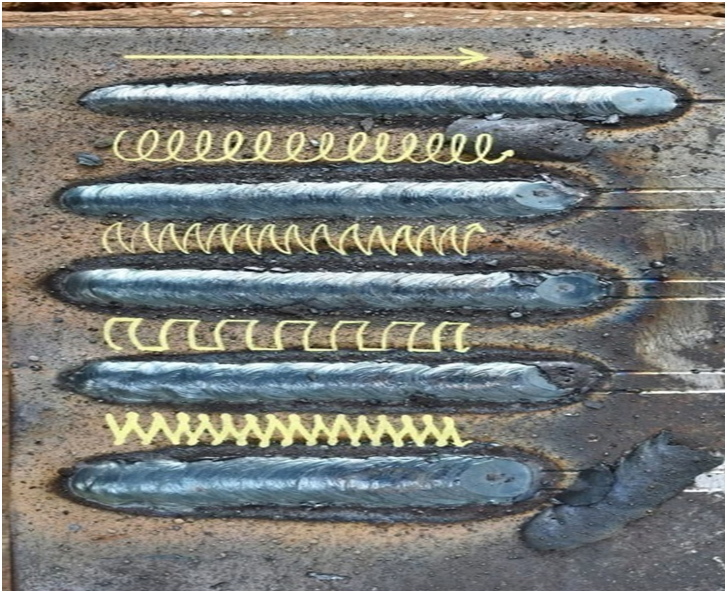
Step 9. Practice Bead Making (Most Important Skill)
For beginners, don’t start with joints.
👉 First practice straight beads on flat plate by drawing straight lines on plate using scriber.
- Hold electrode at 10–15° angle (drag angle)
- Move steadily in a straight line
- Watch the molten pool, not the arc
- 👉 Your goal:
- Even bead
- Consistent width
- No breaks
Step 10. Slag Removal and Inspection
After welding:
- Let it cool slightly
- Use chipping hammer to remove slag
- Clean with wire brush
Check your bead:
- Smooth and even ✔
- No holes (porosity) ✔
- Good fusion ✔
💡 Instructor Tips (From Real Training Experience)
- Don’t rush — beginners improve with consistency, not speed
- If your rod keeps sticking → your amps are too low
- If metal is burning through → amps too high
- Always practice on scrap metal first
How to Stick Weld Beginners Practice Plan
Add something like:
- Day 1: arc striking
- Day 2: straight beads
- Day 3: bead control
- Day 4: lap joints
- Day 5: fillet joints
Common Stick welding for Beginner Problems (Quick Fix)
- Rod sticking → increase amperage
- Arc unstable → check ground clamp
- Dirty weld → clean metal + adjust gas (if needed)
- Uneven bead → slow down movement
🎯 Final Advice
If I were guiding you in person for How to Stick Weld, I’d tell you this:
👉 Don’t aim for perfect welds on day one
👉 Focus on controlling the arc and bead consistency
That’s how real welding skill is built.
Recommended Stick Welding Settings for Beginners
Below are recommended settings for beginners based on electrode type and thickness
| Electrode Size | Electrode Type | Amperage Range (A) | Typical Use | Recommended Material Thickness | Notes for Beginners |
|---|---|---|---|---|---|
| 2.5 mm (3/32″) | E6013 | 90–110 A | Practice beads, light fabrication | 1.5 – 3 mm | Easy arc starting, smooth arc, ideal for learning control and bead consistency |
| 3.2 mm (1/8″) | E6013 | 110–130 A | Medium thickness steel work | 3 – 6 mm | Provides better penetration for thicker metals; slightly harder to control than 2.5 mm |
| 2.5 mm (3/32″) | E6011 | 85–105 A | Dirty, rusty, or painted metal | 1.5 – 3 mm | Deep penetration, more spatter; useful when surface cleaning is limited |
| 3.2 mm (1/8″) | E6011 | 105–125 A | Repair work on contaminated steel | 3 – 6 mm | Strong arc with deeper penetration; requires steady hand |
| 3.2 mm (1/8″) | E7018 | 120–140 A | Structural welding, strong joints | 3 – 8 mm | Low hydrogen electrode; requires proper storage (keep dry) and slightly higher skill level |
How Stick Welding Works (SMAW Principle)
The stick welding process follows a few basic steps:
- Power source creates arc
- Electrode melts and adds filler
- Weld pool forms
- Flux creates protective slag
- Metal cools and solidifies
By learning stick welding, you gain a valuable skill that can be used for DIY projects, repairs, or even a professional career in welding.
Key Features of Stick Welding (SMAW Process Explained)
- No external gas required
- Works outdoors
- Handles dirty metal
- Portable and cost-effective
Applications of Stick Welding in Real Projects
Stick welding, also known as Shielded Metal Arc Welding (SMAW), is widely used because it is simple, affordable, and versatile. For beginners, it provides many practical opportunities to learn welding skills through real-world projects and repairs.
1. Home and DIY Welding Projects
Many beginners start practicing stick welding through small home projects. These projects help develop basic welding skills while producing useful items.
Common beginner projects include:
• Repairing metal furniture such as chairs, tables, and bed frames
• Building a metal workbench or storage shelf
• Welding gates and fences around the home
• Creating decorative metal art or garden items
These simple projects allow beginners to practice arc control, electrode movement, and weld bead formation.
2. Automotive and Farm Equipment Repairs
Stick welding is often used for repairing metal components in vehicles and agricultural equipment.
Examples include:
• Repairing tractor parts and farm tools
• Fixing trailers and metal frames
• Reinforcing rusted or cracked metal components
• Repairing lawnmower decks and frames
Because stick welding works well on thicker metals, it is commonly used for these types of repairs.
3. Small Fabrication Projects
As beginners gain more confidence, they can move on to slightly larger fabrication tasks such as:
• Building metal frames for sheds or storage structures
• Installing handrails and simple stair supports
• Constructing metal racks or tool stands
These projects help beginners develop stronger welding techniques and improve joint preparation skills.
4. Construction and Industrial Applications
Stick welding is widely used in professional welding environments as well. Many industries rely on SMAW for structural welding work.
Common industrial applications include:
• Structural steel construction
• Bridge and building fabrication
• Pipeline welding
• Shipbuilding and marine repair
Learning stick welding can therefore open opportunities for careers in welding and metal fabrication.
5. Outdoor and Field Welding
One of the biggest advantages of stick welding is that it works well in outdoor environments where other welding methods may struggle.
Examples include:
• Repairing machinery on construction sites
• Field welding for farm equipment
• Emergency repairs in remote locations
Unlike some welding processes, stick welding does not require a shielding gas cylinder, making it highly portable and practical for outdoor work.
Essential Stick Welding Equipment for Beginners
Before starting stick welding for beginners, it is important to understand the basic equipment required for the process. One of the reasons Shielded Metal Arc Welding (SMAW) is popular is that it requires fewer tools compared to other welding methods. With the right equipment, beginners can safely practice welding and produce strong metal joints.
Below are the essential tools and equipment needed to start Stick Welding for Beginners.
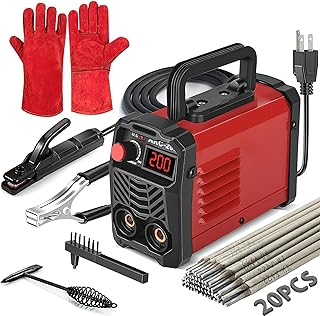
1. Stick Welding Machine (Power Source)
The most important piece of equipment is the stick welding machine, also called an arc welding power source. This machine supplies the electrical current needed to create the welding arc between the electrode and the metal.
For beginners, common types of welding machines include:
• AC welders – Simple and affordable machines suitable for basic welding tasks
• DC welders – Provide a smoother arc and better control for beginners
• Inverter welders – Lightweight, portable, and energy efficient
Many beginners prefer inverter-based stick welders because they are compact, easy to use, and suitable for home workshops. If you are beginner and in search of Best Stick welder Read our compelte guide for best stick welders
2. Welding Electrodes (Stick Rods)
Welding electrodes, often called stick rods, are consumable metal rods used to create the weld. Each electrode has a flux coating that produces shielding gas and slag to protect the weld pool.
Some common electrodes used by beginners include:
• E6013 electrodes – Easy to use and ideal for learning basic welding techniques
• E6011 electrodes – Good for welding on rusty or dirty metal
• E7018 electrodes – Used for strong structural welds
Choosing the correct electrode type helps beginners produce cleaner and stronger welds.
3. Electrode Holder
The electrode holder, also known as a stinger, is the tool used to hold the welding electrode during the welding process. It connects to the welding machine through a cable and allows the welder to control the electrode position while welding.
A good electrode holder should:
• Provide a strong grip on the electrode
• Be insulated for electrical safety
• Allow easy replacement of electrodes
4. Ground Clamp (Work Clamp)
The ground clamp is attached to the metal workpiece or welding table. It completes the electrical circuit between the welding machine and the metal being welded.
Without a proper ground connection, the welding arc cannot be established effectively.
For best results, make sure the clamp is attached to clean, bare metal to ensure good electrical conductivity.
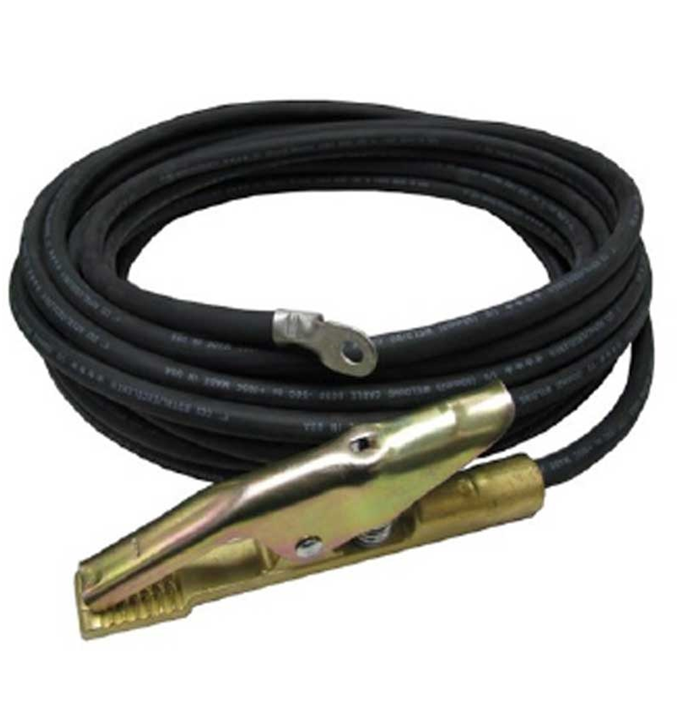
5. Welding Cables
Welding cables carry electrical current from the welding machine to the electrode holder and ground clamp. These cables must be durable and properly insulated to handle high current levels safely.
High-quality welding cables improve arc stability and reduce the risk of overheating.
6. Welding Helmet
A welding helmet is essential safety equipment that protects the welder’s eyes and face from intense arc light, sparks, and harmful ultraviolet radiation.
Modern welding helmets often include:
• Auto-darkening lenses
• Adjustable shade levels
• Comfortable headgear
Using a proper welding helmet prevents eye injuries such as arc eye, which can occur from exposure to welding light.
7. Welding Gloves and Protective Clothing
Safety is an important part of stick welding. Beginners should always wear protective gear such as:
• Leather welding gloves to protect hands from heat and sparks
• Flame-resistant welding jackets
• Safety boots to protect feet from falling metal and slag
Protective clothing helps prevent burns and other welding-related injuries.
8. Chipping Hammer and Wire Brush
After welding, a layer of slag forms over the weld bead. This slag must be removed to inspect the weld.
Two simple tools are used for this purpose:
• Chipping hammer – used to break and remove slag
• Wire brush – used to clean the weld surface
Cleaning the weld helps reveal the final weld bead and ensures proper weld quality.
Starting stick welding for beginners does not require expensive or complicated equipment. With a basic welding machine, electrodes, safety gear, and a few essential tools, beginners can begin practicing and developing their welding skills.
Stick Welding Safety Tips for Beginners (Explained)
Stick welding, also known as Shielded Metal Arc Welding (SMAW), is a widely used and beginner-friendly welding process. However, stick welding involves high temperatures, intense arc light, and molten metal, which can pose serious risks if proper precautions are not followed. Beginners should always follow essential welding safety practices to protect themselves from burns, eye damage, and other injuries while working with stick welding equipment.
By understanding basic safety rules, beginners can create a safe welding environment and work confidently.
1. Always Wear Proper Welding Safety Gear
Personal protective equipment (PPE) is essential for protecting the welder from sparks, heat, and harmful radiation.
Important welding safety gear includes:
• Welding helmet with proper shade lens to protect the eyes from arc light
• Leather welding gloves to protect hands from heat and sparks
• Flame-resistant welding jacket or apron
• Safety boots to protect feet from falling metal and slag
• Safety glasses for additional eye protection during grinding and cleaning
Proper protective clothing reduces the risk of burns and eye injuries.
2. Protect Your Eyes from Arc Flash
The electric arc used in welding produces intense ultraviolet (UV) and infrared radiation. Direct exposure to this light can cause a painful eye condition known as arc flash or welder’s flash.
To avoid this problem:
• Always use a welding helmet with the correct lens shade
• Never look directly at the welding arc without protection
• Make sure nearby workers also use protective screens
3. Ensure Proper Ventilation
Stick welding produces fumes and gases that may be harmful if inhaled in large amounts. Beginners should always weld in areas with good airflow.
To maintain safe ventilation:
• Work in an open or well-ventilated space
• Use exhaust fans or ventilation systems if welding indoors
• Avoid welding in confined spaces without proper air circulation
Proper ventilation helps reduce exposure to welding fumes.
Welding fumes can contain hazardous particles, and proper ventilation is recommended to reduce exposure during welding operations. Read More
4. Prevent Fire Hazards
Welding sparks and hot slag can easily start fires if flammable materials are nearby.
Follow these precautions:
• Remove flammable materials such as paper, wood, fuel, and chemicals from the welding area
• Keep a fire extinguisher nearby
• Make sure the work area is clean and dry
• Never weld near gas cylinders or combustible substances
These simple steps can significantly reduce fire risks.
5. Check Welding Equipment Before Use
Before starting any welding job, beginners should inspect their equipment to ensure it is safe to use.
Check the following:
• Welding cables for damage or exposed wires
• Electrode holder for proper insulation
• Ground clamp for secure connection
• Welding machine settings for correct current
Proper equipment inspection helps prevent electrical accidents.
6. Maintain a Clean and Organized Workspace
A cluttered workspace can increase the risk of accidents during welding.
For safer welding:
• Keep the work area free from unnecessary tools and materials
• Arrange welding cables neatly to avoid tripping hazards
• Ensure good lighting around the welding area
A clean workspace improves both safety and productivity.
7. Avoid Electric Shock
Stick welding uses high electrical current, which can be dangerous if proper precautions are not taken.
To reduce electrical hazards:
• Keep hands and clothing dry
• Avoid welding in wet or damp conditions
• Use insulated gloves and equipment
• Turn off the welding machine when not in use
Following these steps helps protect welders from electrical shock.
The American Welding Society provides detailed welding safety recommendations to help prevent burns, electric shock, and exposure to harmful welding fumes. Read More about Welding Safety
Learning safe habits early will help welders work confidently and responsibly in both home workshops and professional environments.
Final Thoughts
Stick welding is one of the best skills beginners can learn. It is simple, versatile, and widely used in real-world applications. With consistent practice and proper safety habits, you can quickly develop strong welding skills and handle a variety of projects.
Learning stick welding for beginners is an exciting and practical way to gain a valuable skill in metal fabrication, home repair, or professional welding careers. By understanding the SMAW process, practicing with the right equipment, and following essential safety tips, beginners can develop confidence and competence quickly.
For beginners planning to invest in welding gear, check our detailed guide on choosing the best stick welding equipment for beginners to ensure you have the right tools for a safe and successful start read our complete guide on Best Stick Welder Under $200 for beginners.
FAQs
Q1: What is stick welding?
Stick welding (SMAW) uses an electric arc to melt a flux-coated electrode and base metal to form a strong joint.
Q2: Is stick welding suitable for beginners?
Yes, it’s one of the easiest welding methods to learn due to simple equipment and versatility.
Q3: What basic equipment do I need for stick welding?
A welding machine, electrodes, holder, ground clamp, helmet, gloves, and basic tools.
Q4: How can I stay safe while stick welding?
Wear proper PPE, ensure ventilation, keep your workspace clean, and always inspect your equipment before use.
Q5: Can I weld outdoors with stick welding?
Yes, stick welding works well outdoors and in windy conditions.
Q6: What type of electrodes should beginners use?
E6013 electrodes are best for beginners due to ease of use and smooth arc.
Q7: Should I buy new or used welding equipment?
New inverter welders are recommended for beginners due to reliability and safety. Used machines are cheaper but must be carefully inspected.